

Weebly is an excellent choice if you're looking for a web builder to build a professional website that is affordable and easy to use. With its drag-and-drop customization, you can create a website for your business even when you have little to no experience in web designing. Even if you're a seasoned web designer, Weebly as a web builder also offers custom HTML/CSS and Javascript that enables you to fully customize your web interface.
As a subsidiary of Square, Weebly is particularly popular as an e-commerce web builder, making it easier to integrate for online payment. In addition to that, you can now incorporate a blog by adding BlogHandy codes to your Weebly website.
In this tutorial post, we will discuss the complete guide on creating a blog section on your Weebly website using the BlogHandy platform.
.jpg)
What is Weebly?
Weebly is one of the most popular web builders, mainly known for its beginner-friendly structure with its drag-and-drop customization feature. On top of that, Weebly also offers affordable plans with their Pro plan starting from as low as $12 per month.
For beginners, Weebly comes with its Ultimate SEO guide to introduce you to the importance of search engine optimization for your business website. It comes with an SEO checklist that you can take advantage of, and Weebly also offers various themes that you can adjust easily by using its drag-and-drop feature.
Weebly is ideal for small businesses, as you can run your website and accept online payment through Square. With Weebly Pro, you can also integrate it with a third-party payment platform. Building a website on Weebly also enables you to add extra tools to your e-commerce, making it easier to streamline your online shop.
Getting Started with Weebly and BlogHandy
As a web builder, Weebly also comes with its native blog feature. However, you also have an option to integrate BlogHandy for your blogging purpose, enabling you to add a blog page on your Weebly website.
While you can also use Weebly's native blog page, BlogHandy also offers built-in SEO and social media sharing functionality which can improve your blogging experience on your website. Sign up for a free trial on BlogHandy to incorporate the codes into your site, and here are some steps to add BlogHandy to your Weebly website!
.jpg)
Adding BlogHandy to Your Weebly Website
Go to your Weebly dashboard, and click the "Edit site" button, which will direct you to your web editor page. Head over to the top of the page, where you will find a menu list, and click on the "Pages" option. You will find the pages on the primary menu on your website here, add the "+" icon to incorporate a new page on your website.
.jpg)
Adding an Embed Element on Your Weebly Website
When you click the "+" icon, there is also an option to add a new blog page on your Weebly website. However, since we are not going to use the native blog feature from Weebly, click on "Standard Page" instead and rename the page into "Blog" or anything you prefer for the title of your blog page.
In the section where you can rename your blog page, you will also find a few options to customize it. Double click on the SEO Settings option, and find the "Footer Code" field where you will add your BlogHandy code to your Weebly website.
.jpg)
Adding a Custom HTML Element on Your Weebly Website
Log into your BlogHandy account to get a custom HTML element, and you will find the codes needed on your BlogHandy dashboard. Copy the code on the "Step 1" box, and paste it into the "Footer Code" field on your Weebly website.
The first code you add should be similar to this:
Once it's added in the right place, click the "<" button on the menu, and click "Done."
.jpg)
Adding a BlogHandy Custom Code on Your Weebly Website
Now, you will see the blog page on the main menu of your Weebly website and now it's time to add a BlogHandy custom code on the particular page where you want your blog to show.
Click on the blog page you just created, and here you will find a blank page where you can add any elements for your Weebly website. You will see a box with "Drag Elements Here" written inside it, click "Build" on the menu, and you will find some element options that you can add to the page.
.jpg)
Drag "Embed Code" element that you can find in the options, and drop it in the previous box. Next, you will see "Click to set custom HTML" written in the box. Head back to your BlogHandy account, and now it's time to copy the code under "Step 2" in the dashboard.
The code will be shorter than the first one, and it will look like this:
.jpg)
Once you copied the code, go back to your Weebly website and click on the box where you incorporated the "Embed Code" element. A Custom HTML code will pop up, and you can click "Edit Custom HTML" to paste the previous BlogHandy code.
Click anywhere outside the box, and last but not least, double click the "Publish" button to finalize your customization.
.jpg)
Updating Your Weebly Blog URL in BlogHandy
After your Weebly blog is published, it will give you a pop-up notification with your Weebly URL. Click on it, and head over to your blog page. If you already have some blog posts published, they will automatically appear on this page.
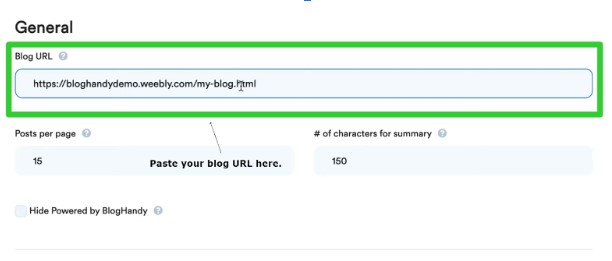
Head over to the website address on your browser and copy the URL. Then, go back to your BlogHandy account, and click on the "Settings" option on the main menu to update your Weebly blog URL in BlogHandy.
In the "Settings", you will see the "Blog URL" field in the General section, where you can paste your Weebly blog URL to incorporate it into your BlogHandy account. Scroll down, and click the "Save all changes" button to finalize the setup.
Publishing a New Blog Post on Your Weebly Website with BlogHandy
Now that your blog posts show up on your Weebly website and you've updated your blog URL on BlogHandy, it's time to use BlogHandy to create your new blog posts.
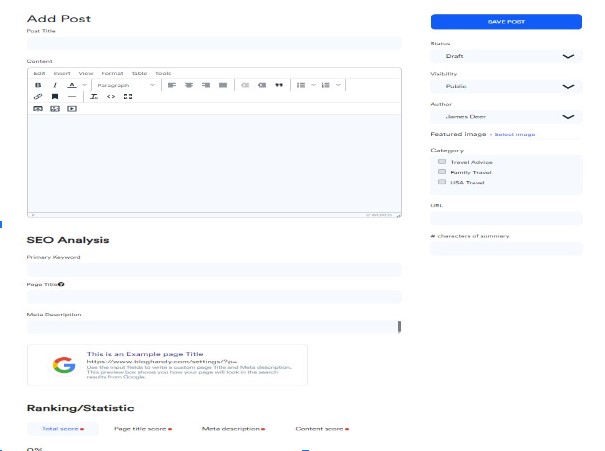
Click "Posts" on the main menu navigation, and "Add posts" to start a new draft. On the left side of the Editor page, you will find three sections: Post section, SEO Analysis, and Ranking/Statistic.
In the Post section, you can create and edit the blog post accordingly. Scroll down to the SEO Analysis, this is where you can set up the primary keyword you look to rank for SEO purposes. You can also add the blog title and meta description to appear on the search engine.
In the last section, Ranking/Statistic will give you suggestions to improve your SEO score. You can modify it accordingly to optimize your content for search engines. On the right side of the Editor page, you can also change the status of your post, the publishing date and time, as well as the blog post URL.
Tips for Blogging with Weebly and BlogHandy
Due to its affiliation with Square payment, Weebly is an excellent choice for small business owners who are ready to digitalize their business.
With an affordable annual rate for its pro version and the integration with Square as the primary payment method, it's an all-in-one solution for small businesses that are ready to build their e-commerce website. In addition, having a blog section can help to increase your visibility online through SEO and social media sharing, and this is where BlogHandy can optimize the user experience of your website.
Easily integrated by adding two lines of code on your Weebly page, BlogHandy also comes with built-in SEO and social media sharing tools to optimize the engagement rate on your website. Sign up for a free trial on BlogHandy now, or check out this video tutorial to incorporate BlogHandy on your Weebly website!