
The first thing that comes to mind when you hear about ClickFunnels is that it's one of the market leaders for sales funnel software suitable for all types of businesses. On top of creating a sales funnel for your business, you can now add a blog to a ClickFunnels landing page to optimize your business's digital presence.
Those who use ClickFunnels as a landing page for their business are most likely aware of how crucial it is to have a sales funnel as a strategic framework for guiding their potential customers through their purchasing journey. From brand awareness to the final purchasing decision for the end user, your sales funnel can help you engage and nurture your existing customers, which can lead to upselling and cross-selling.
A sales funnel for your business can increase customer retention, which can be a lucrative way to sustainably maintain and grow your business. Adding a blog to your ClickFunnels landing page can help you optimize it for search engines. At the same time, it can simultaneously bring you more leads to convert into paying customers.
In this post, we'll dive deep into ClickFunnels as a landing page builder and how you can add blogging functionalities to your ClickFunnels landing page with BlogHandy.

What is ClickFunnels 2.0?
ClickFunnels 2.0 claims to be an all-in-one marketing platform that provides you with anything you need to grow your business digitally. In addition to the sales funnel as the platform's best feature, you can create a business website through ClickFunnels and set up email marketing to nurture your existing mailing list. It's also widely used by professionals leveraging ClickFunnels for affiliate marketing, making it a versatile tool for digital growth.
Previously, in ClickFunnels 1.0, you had to create separate pages to build your sales funnel. However, you can now compile all your business activities in one platform with ClickFunnels 2.0.
In a nutshell, you can automate your business's workflow in one platform with ClickFunnels without using various software to create a system that works for your online business. It's an ideal ecosystem if you want to have one go-to platform for all your business needs.
While it seems too good to be true, ClickFunnels also comes with a catch: their subscription fee is relatively high compared to other platforms with the same functionalities. Starting from USD 127 per month, similar features that ClickFunnels offers in their premium plan can be found on media like GetResponse or SwipePages for cheaper.
Nonetheless, there are some features that ClickFunnels excels at compared to those similar platforms. For instance, ClickFunnels has membership site functionalities that will come in handy if you sell online courses. Compared to other platforms with the same functionality, like Kajabi, the monthly subscription fee for ClickFunnels is cheaper, making it an excellent choice if you want to stretch a budget for this feature.
Why You Need to Add a Blog to a ClickFunnels Landing Page with BlogHandy

Although ClickFunnels 2.0 has its native blogging feature, adding a blog to ClickFunnels with BlogHandy can add a few advantages since BlogHandy comes with built-in SEO and social sharing tools that may come in handy to circulate your content on the internet.
The SEO functionality in BlogHandy will guide you to create quality content that can help it rank faster in the eye of Google and other search engines like Bing, Yahoo Search, and even private ones like DuckDuckGo or Ecosia. In addition, social sharing tools are necessary if you want your content to be easily shared by your audience across social media tools like Facebook or Pinterest.
You can now add a blog to a ClickFunnels Landing page with BlogHandy by adding a couple of HTML codes to add these functionalities to your business website. In the next section, we will talk about how to add a BlogHandy blog to your ClickFunnels page!
Tutorial: How to Add a Blog to a ClickFunnels Landing Page with BlogHandy
You can sign up with BlogHandy for free, creating up to five blog posts without spending money to add a blog to your ClickFunnels landing page.
Without further ado, here's the tutorial to add a blog to your ClickFunnels landing page with BlogHandy!
#1 Go to Site & Funnels on your ClickFunnels dashboard

Log into your ClickFunnels account. On the dashboard, you will see the menu list on the left-hand side of the monitor. Click "Site & Funnels" to get started, as this section will lead you to the editor page for your ClickFunnels landing page.
#2 Create a custom blog page
As you will use BlogHandy as the third-party blogging platform in this case, you will need to create a custom blog page from scratch instead of using the "Blog" option in the menu list of your "Site & Funnels" section.
On the left-hand side of your monitor, you can click the "Pages" option, where you will see a few sections, including Standalone pages, Theme pages, etc. Go to the Theme pages, and scroll down to find the "Home template" page to duplicate.
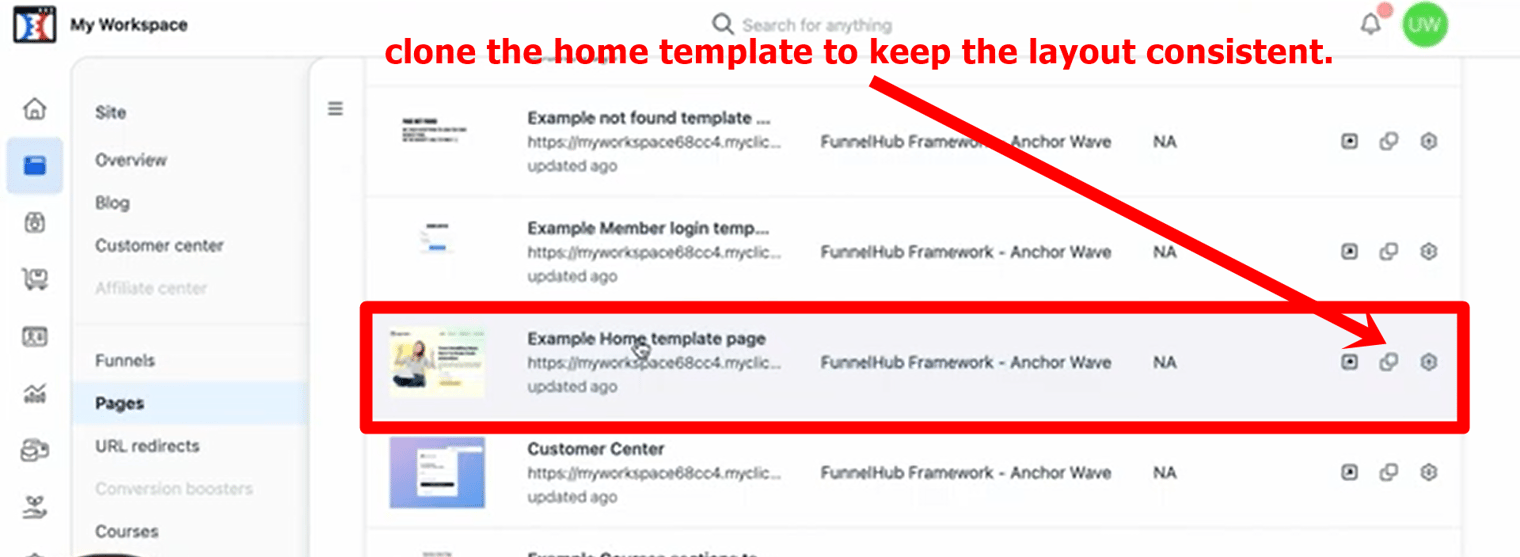
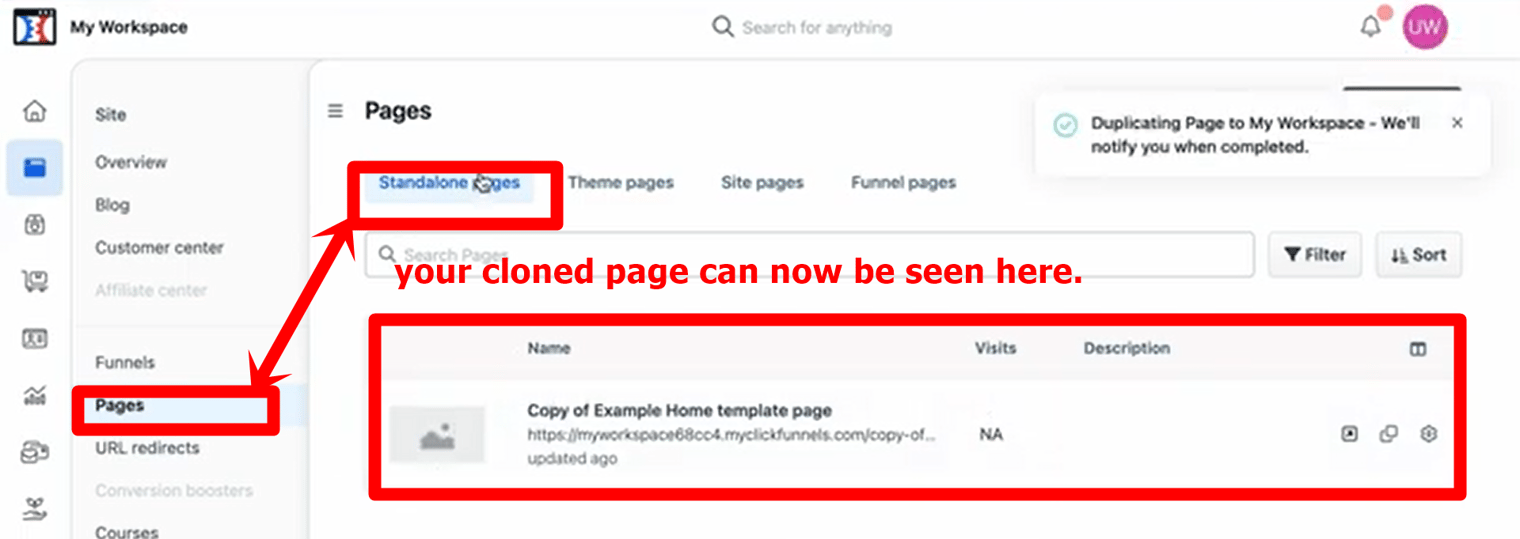
Assuming you want your blog page to have the same structure as your homepage on your ClickFunnels landing page, using this "Home template" for your custom blog page will save you time to redesign your blog page later. Click the "Clone" icon on the template, and you will see the cloned page in the "Standalone pages" section to proceed.
#3 Rename your custom page
In the "Standalone pages" section, you can hover over your cloned template for your custom blog page and click the Setting icon to check your blog URL. In the settings, you can replace the page name with "My Blog" (or anything you like) to identify it when it's time to customize the design on your ClickFunnels landing page later.
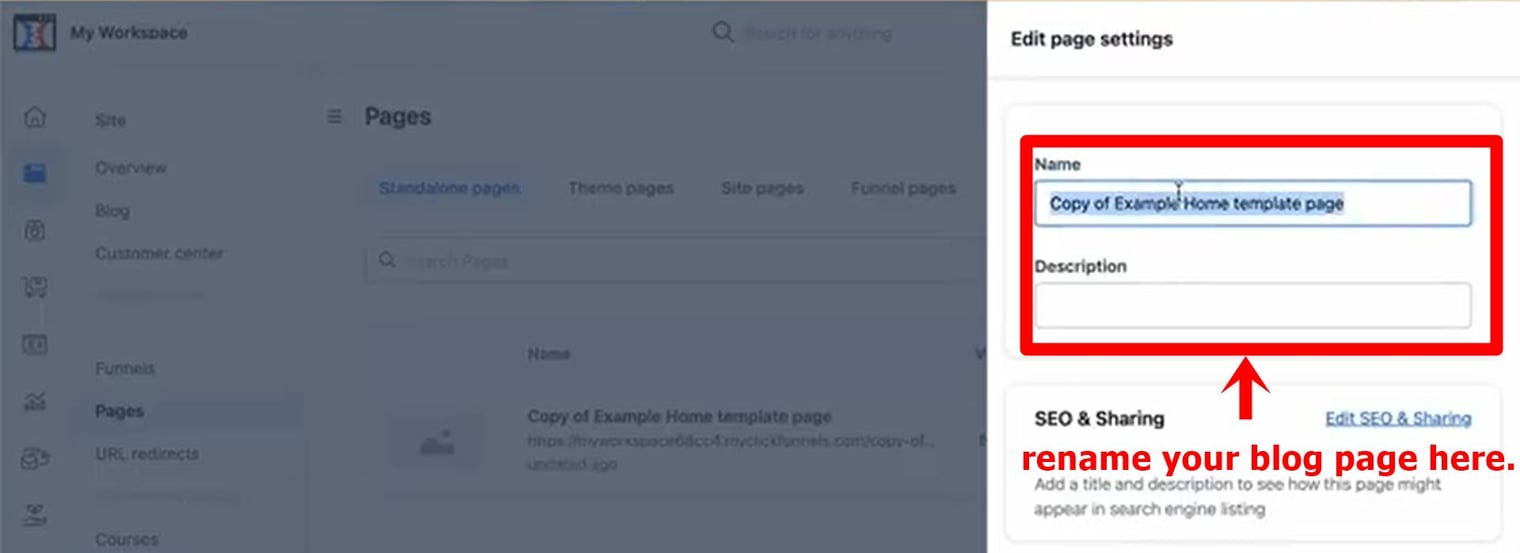
While you may not need it now, this section will also show your blog URL, which will be helpful later when you add it to your BlogHandy settings.
#4 Choose your custom blog page to edit
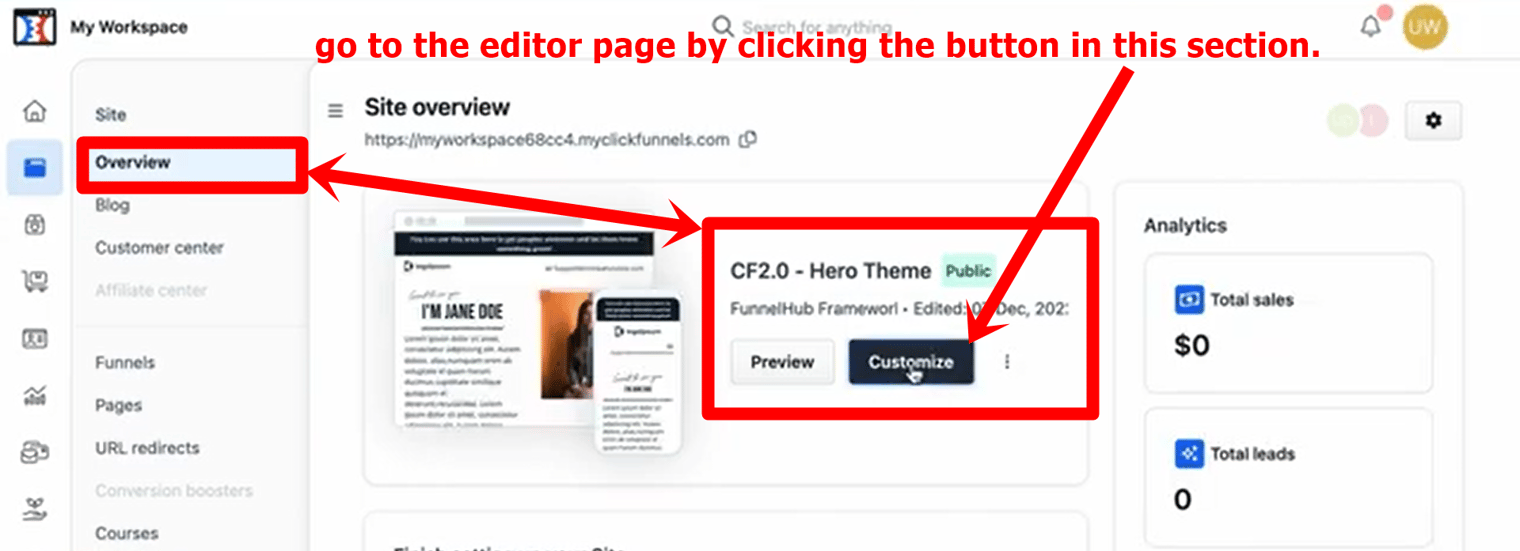
Next, return to the previous "Site & Funnels" section, where you can see the Site Overview at the top. Click the "Customize" button to edit your custom blog page.
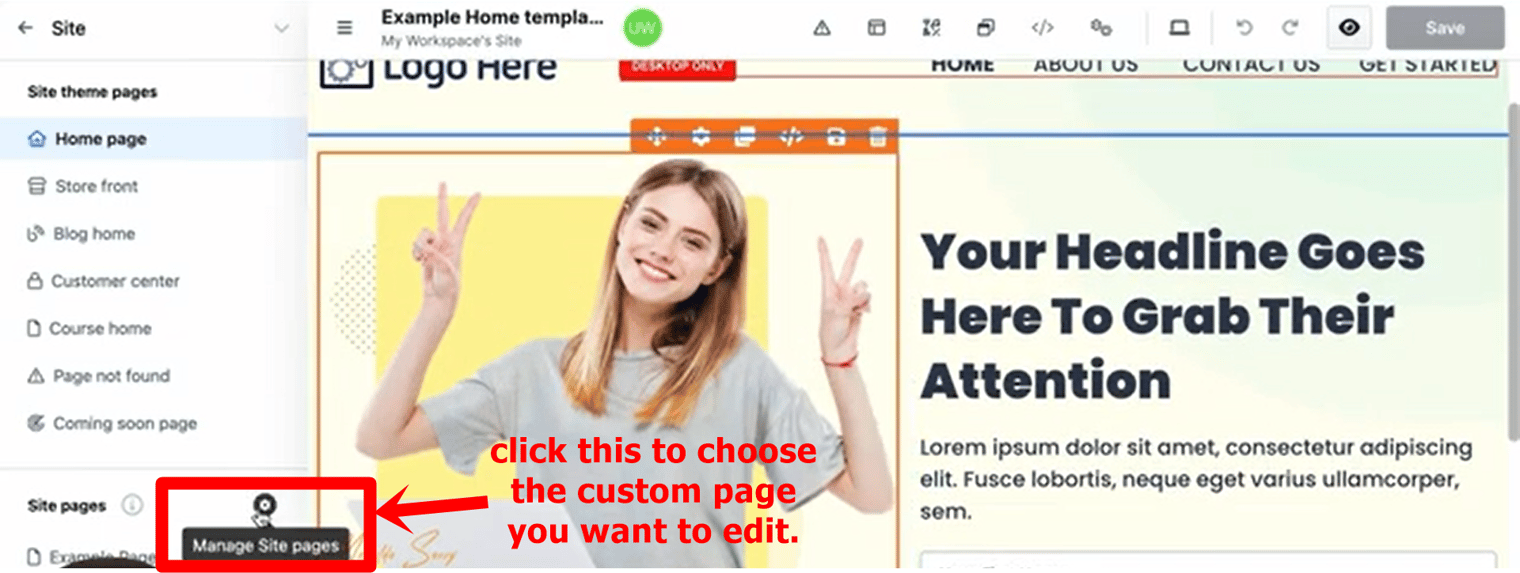
It will take you to the editor page on your ClickFunnels landing page. On the left-hand side, you will see a list of menus that you can choose to edit the layout. Go to the "Site pages" option, where you can click the icon next to it that says "Manage Site Pages," and click it.
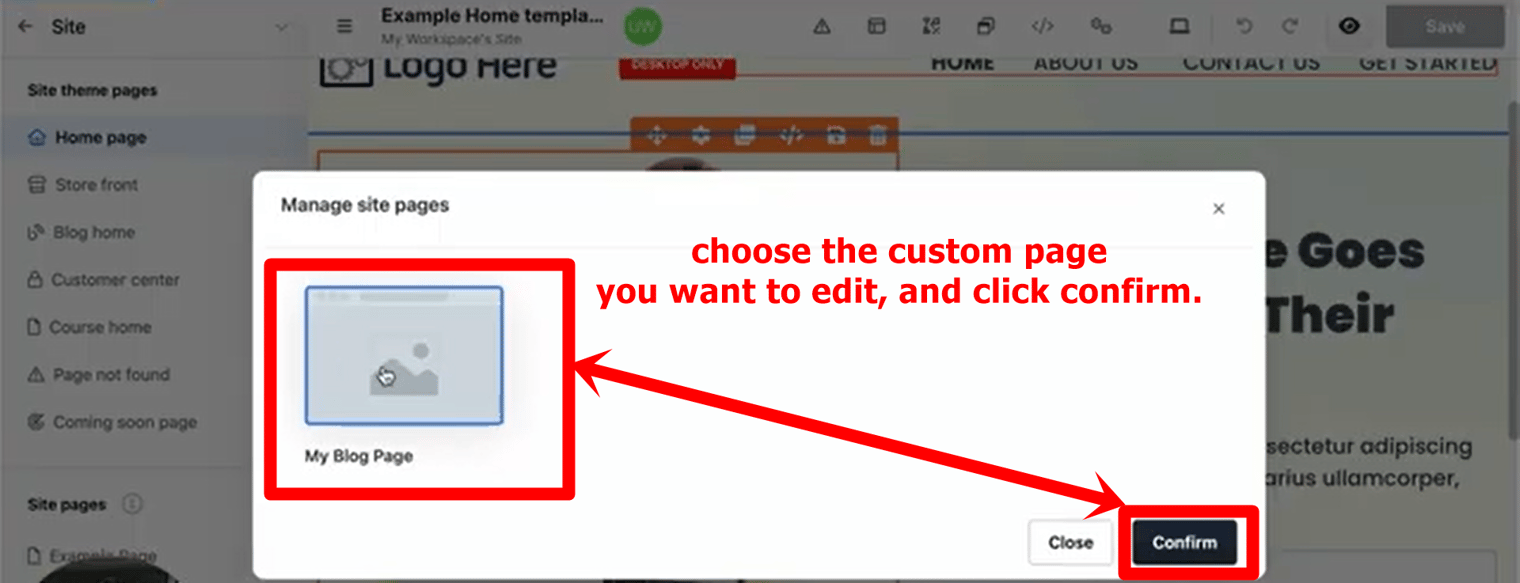
A pop-up will appear with the page options that you want to edit. This is also why the previous step to rename your custom page is essential so that you can identify which custom page you want to edit.
Choose the custom page and click the "Confirm" button to proceed.
#5 Edit the blog layout for a ClickFunnels landing page
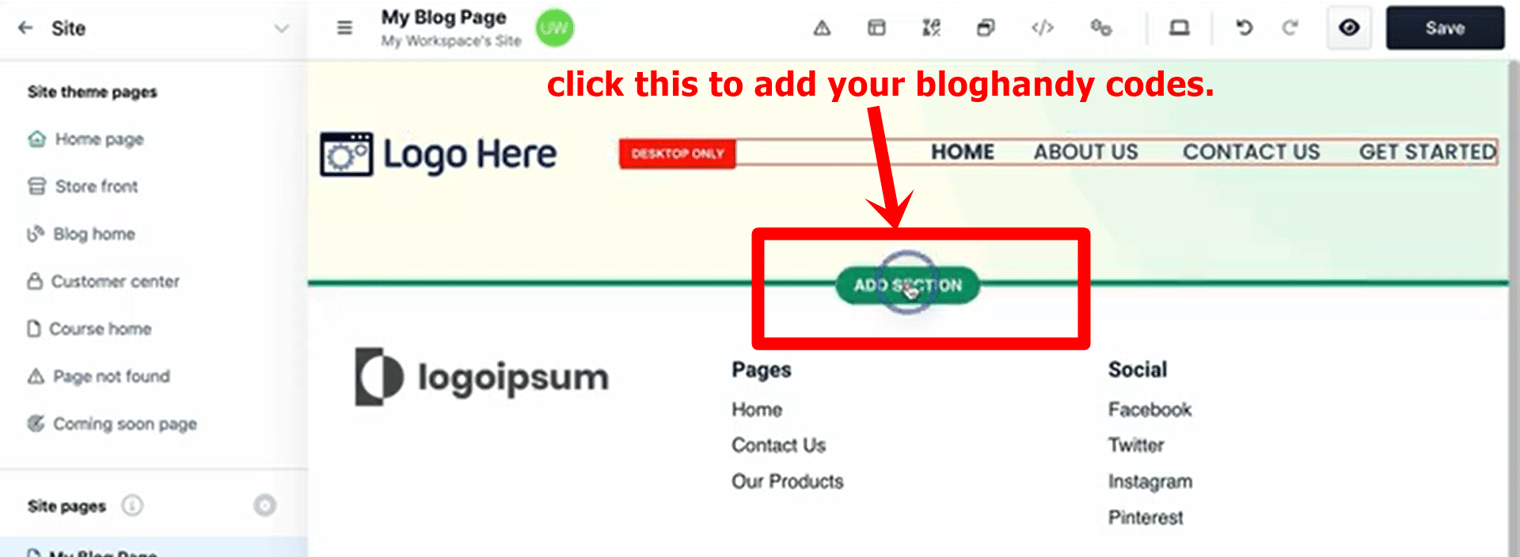
Since the page was cloned from the homepage template, you want to delete the main section to make room for where your blog will appear on this page. Delete everything except for the menu header and footer, and hover over the area in between until the option to "Add a section" appears and click it.
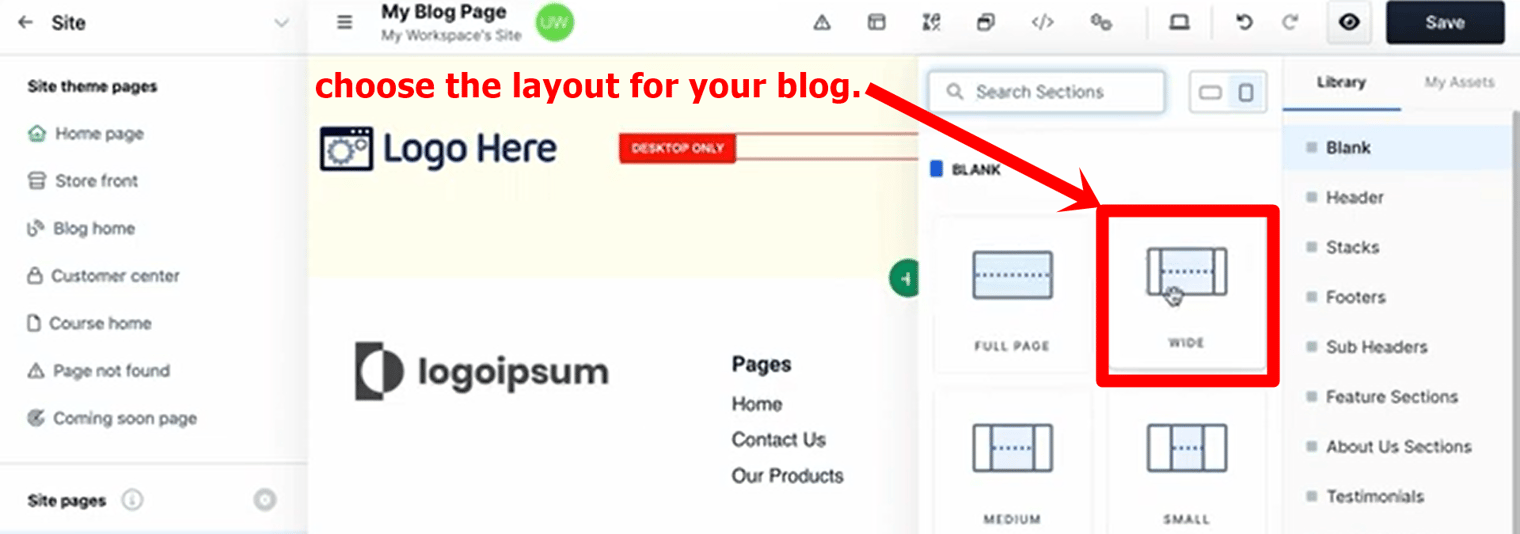
Next, you will be given layout options for your blog page to set according to your preference, whether you want it in full-width style or make it a 2-column page. For this one, we picked the Wide option for the page with one column.
#6 Add BlogHandy codes to ClickFunnels
In the new section, you will see the rectangle with the "+" icon in the middle. Click the icon, and the pop-up with various element options will appear for you to choose. Scroll down until you see the "Custom JS/HTML" option, and click it to proceed.
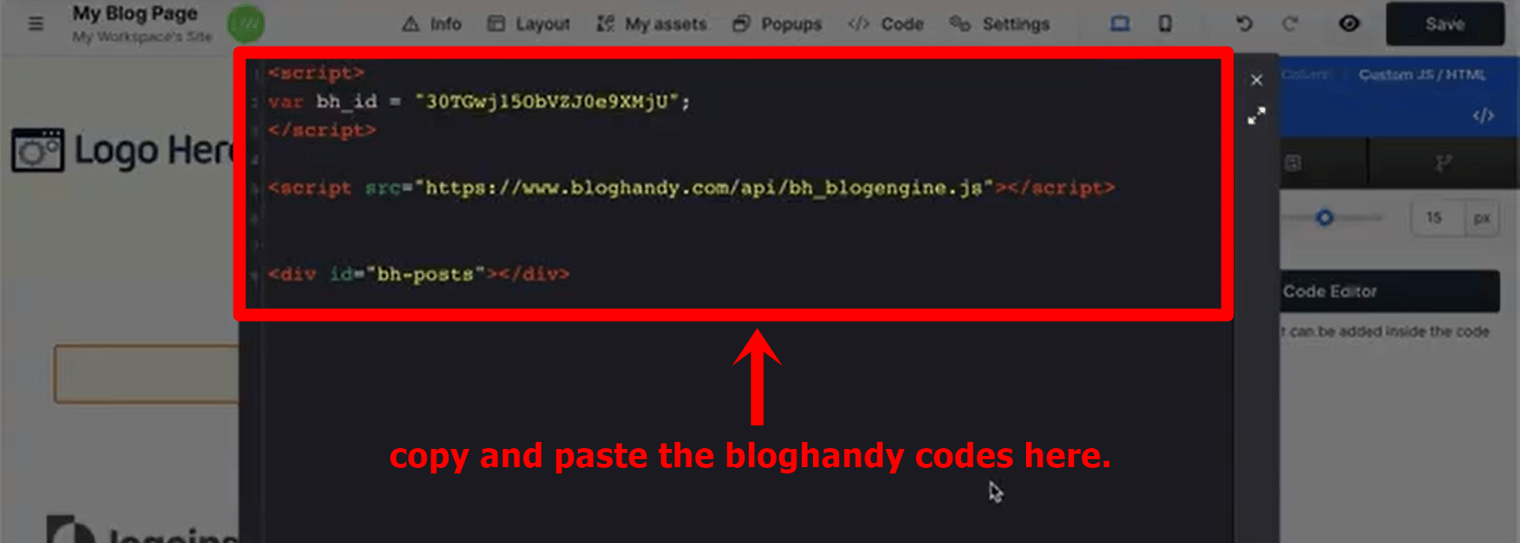
You will see the "Open Code Editor" button on your monitor's right-hand side. Click on it, and the HTML box will appear where you should add your BlogHandy codes to ClickFunnels.
Next, go to your BlogHandy dashboard to see the two lines of codes to copy. Paste both legends in the previous box, and click the "x" icon on the right corner to finalize.
#7 Edit the menu bar on a ClickFunnels landing page
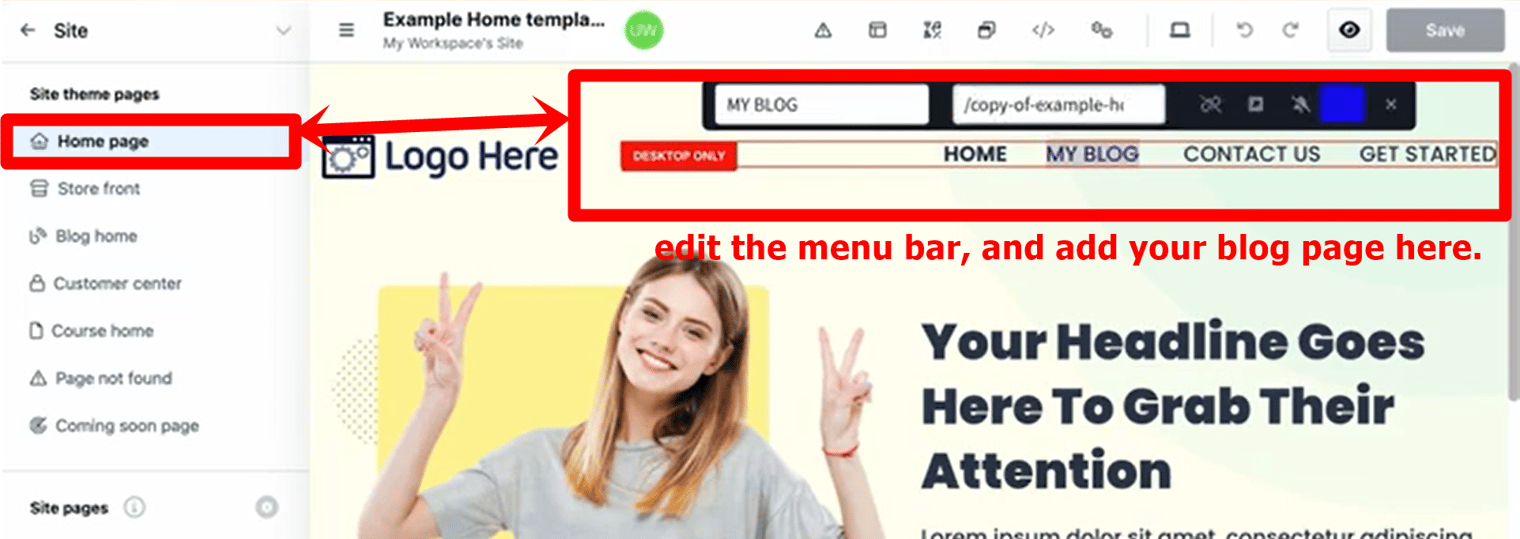
On the left menu on your editor page, click the "Home page" section to edit the menu bar on your landing page so you can add your custom blog page to the main menu. In this sample, we will replace the "About Us" page with "My Blog" and add the blog URL to complete this step.
Click the "Save" button at the top, and check your ClickFunnels landing page preview to test the changes you made on your editor page. When set correctly, your BlogHandy blog will be integrated well with your ClickFunnels landing page and appear on your Blog page already.
#8 Add the ClickFunnels blog page URL to your BlogHandy settings
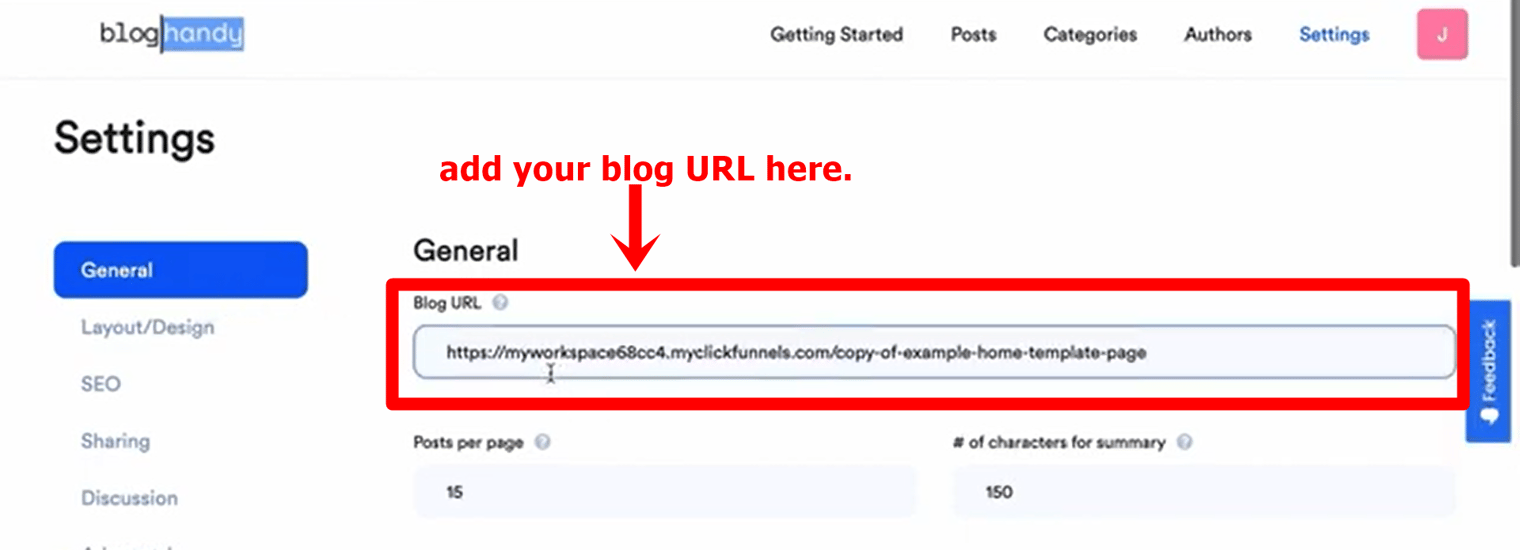
To complete the change, add the blog page URL on your ClickFunnels to your BlogHandy settings. Copy your blog page URL, and go back to your BlogHandy dashboard.
Go to Settings, and you will see the "Blog URL" column in the "General" section, where you can paste the URL and scroll down to save the changes.
#9 Change the blog design on BlogHandy
After adding your blog page URL on BlogHandy, you can now change your blog layout using the platform. In your BlogHandy Settings, click the "Layout/Design" option, and you will find the 9 default templates that you can choose your preferred one as your blog layout. Click "Save" to finalize, and you can test it out by refreshing your blog page URL to see the change.
Alternatively, you can customize your blog design by adding CSS code in the "Layout/Design" section on your BlogHandy Settings. You can also contact the BlogHandy team so they can customize the codes according to your liking if you're not familiar with CSS yourself.

Conclusion
Although ClickFunnels is a complete marketing tool for your business, BlogHandy will come in handy for its blogging functionalities, as you can have additional SEO and social sharing features for your ClickFunnels blog page.
Combining ClickFunnels and BlogHandy will give you advantages to excel at your business website, as you can have a sales funnel to nurture your existing customers and build content through your blog to get more leads through search engines and social media.
So, are you looking for an alternative to add a blog to a ClickFunnels landing page with built-in SEO and social media sharing tools? Sign up now for a BlogHandy account, and start creating content for your ClickFunnels landing page!