
There's no better time to use artificial intelligence in your workflow than right now, as platforms like Unbounce have started incorporating AI in their landing page builder platform which makes it easier to create one, even for beginners.
Nowadays, you can easily find numerous landing page builders with various features, but not many of them offer AI copywriting features like Unbounce. Not only can you maximize the feature by creating a landing page with a compelling copy to convert your leads into customers, but you can also optimize it by implementing a blog marketing strategy with BlogHandy in your Unbounce landing page.
The AI copywriting technology on Unbounce will save you time building content from scratch, while the blogging feature on BlogHandy will enable you to optimize your content for SEO to get it performed on Google and other search engines.
Additionally, tools like text to speech can further enhance your content by converting it into audio format for greater accessibility.
In this post, we'll dive into Unbounce as a landing page platform and how you can add a blog to an Unbounce landing page using BlogHandy. Without further ado, let's find out what you need to know about Unbounce and BlogHandy and how they can add value to your marketing strategy!
What is Unbounce?
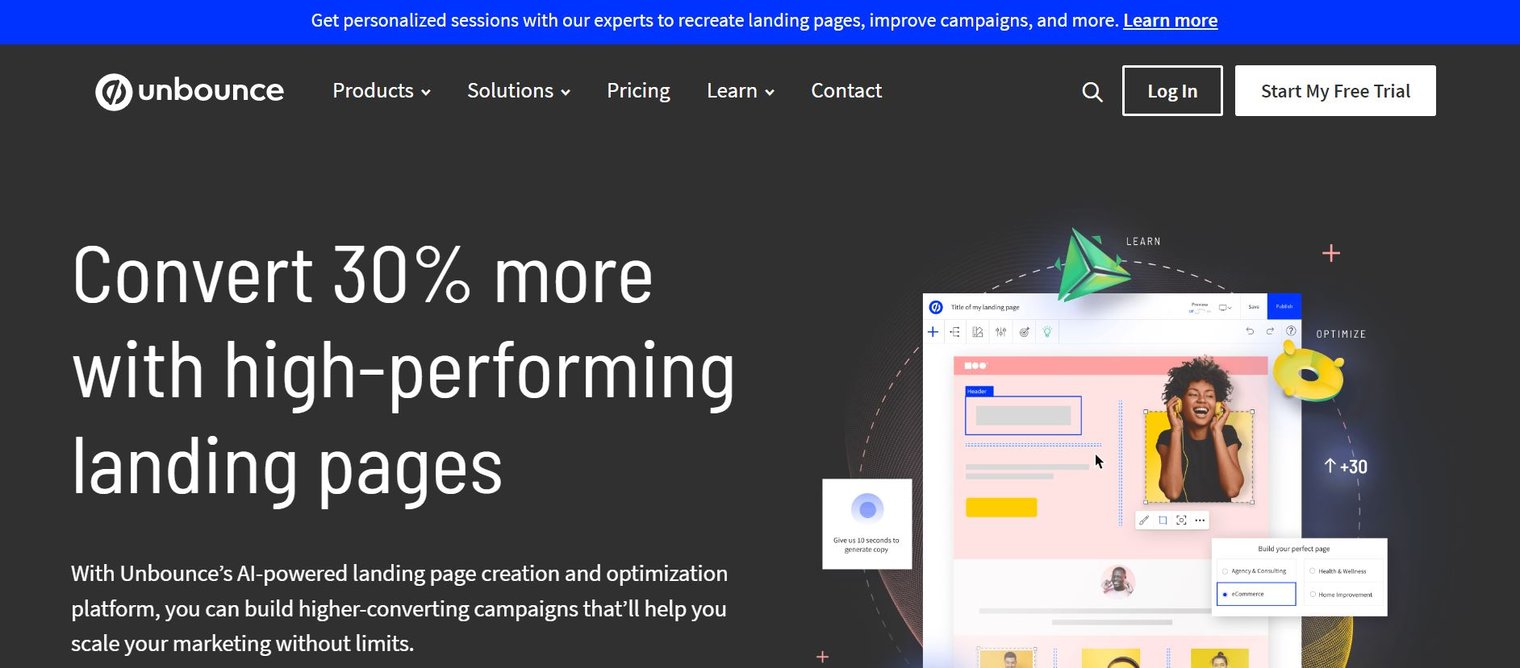
Unbounce may not be the first thing that comes to mind when it comes to landing page builders. However, the platform can be a great choice for AI aficionados as Unbounce has built-in AI features for both design and copywriting that can make your workflow easier.
Essentially, Unbounce has all the features other landing page builder platforms have. You can create a landing page, a popup to stick on your business website or integrate it with various other SaaS platforms to streamline your marketing strategy.
However, their AI technology is one step ahead of their competitors as you can take advantage of their AI functionalities to create copy and design for your landing page or email content. This feature can be a great added value, especially if you want to save costs without hiring a landing page builder specialist or copywriter for your business.
You can get a free trial for Unbounce for 14 days, and their premium plan starts from $74 USD per month. While their monthly subscription is on the higher end compared to other landing page builders like Carrd or GetResponse, it's worth paying extra especially if you want to maximize using AI in your content marketing strategy!
Why You Should Add a Blog to an Unbounce Landing Page with BlogHandy
Setting up an Unbounce landing page can be a great strategy to convert your leads if you already have an existing audience. However, blog posts can bring more value as they can boost your brand awareness in a way that helps your target market and provides context for your services or products.
Your blog posts can be informational, while they can also optimize your landing page for SEO. BlogHandy is a blogging platform that can add these functionalities to an Unbounce landing page just by adding a couple of lines of code to your editor page.
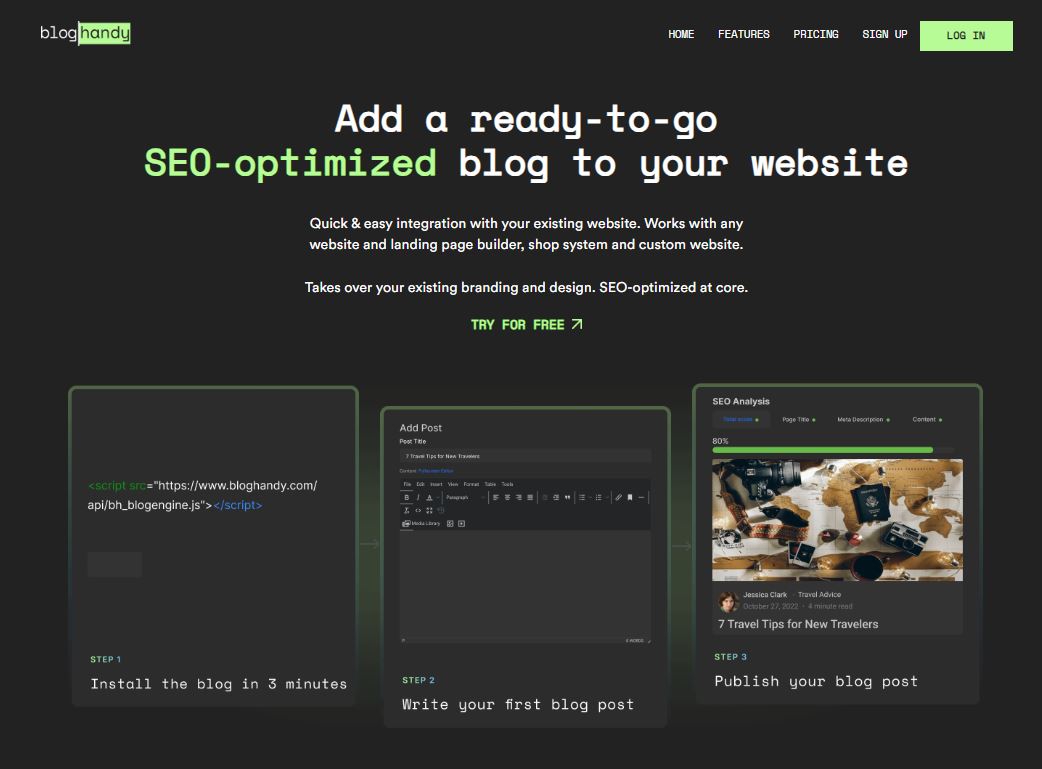
BlogHandy will provide you with a rich blogging feature for your Unbounce landing page, and you can also add social sharing tools that make it easier for your audience to share your content across platforms like Facebook, Twitter, or Pinterest. There's no plugin necessary, as you can integrate BlogHandy with an Unbounce landing page in a few simple steps.
Combined with the native AI copywriting functionality on Unbounce with additional features like SEO and social sharing tools on BlogHandy, adding a blog to an Unbounce landing page can be a great way to boost your content marketing strategy for your business!
Tutorial: How to Add a Blog to an Unbounce Landing Page with BlogHandy
Sign up for a new Unbounce account to get started, and you'll get to the Dashboard once you complete the steps. On the left-hand side of the monitor, you will see the menu list where you can start creating a landing page on Unbounce.
Here is a tutorial on creating an Unbounce landing page and adding a search engine-optimized blog using BlogHandy!
1. Click on the "Pages" option and create a new page
.jpg)
Assuming you start your landing page from scratch, you can click the "Pages" option on the menu, which will take you to the list of pages you have created on Unbounce. If you already have a page there, it means you already have an Unbounce landing page set up. If not, the list will be empty, and you'll see the "Create New" button to get you started.
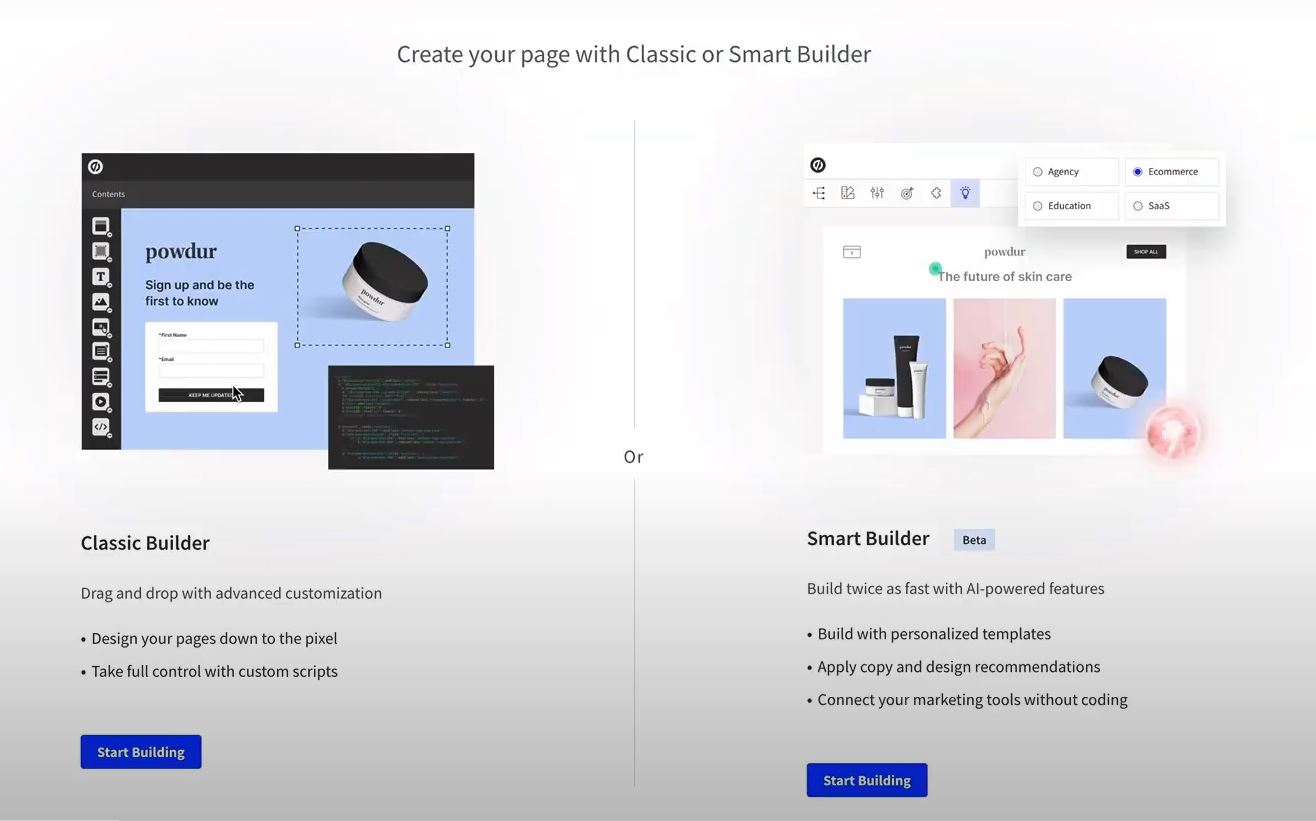
There will be two options where you can choose either the "Classic Builder" or "Smart Builder" to create your landing page. If you choose "Smart Builder," it means you allow the native AI functionality on Unbounce to create an automatic landing page for you. Meanwhile, clicking the "Classic Builder" will direct you to the ready-to-use template options to choose the theme for your landing page.
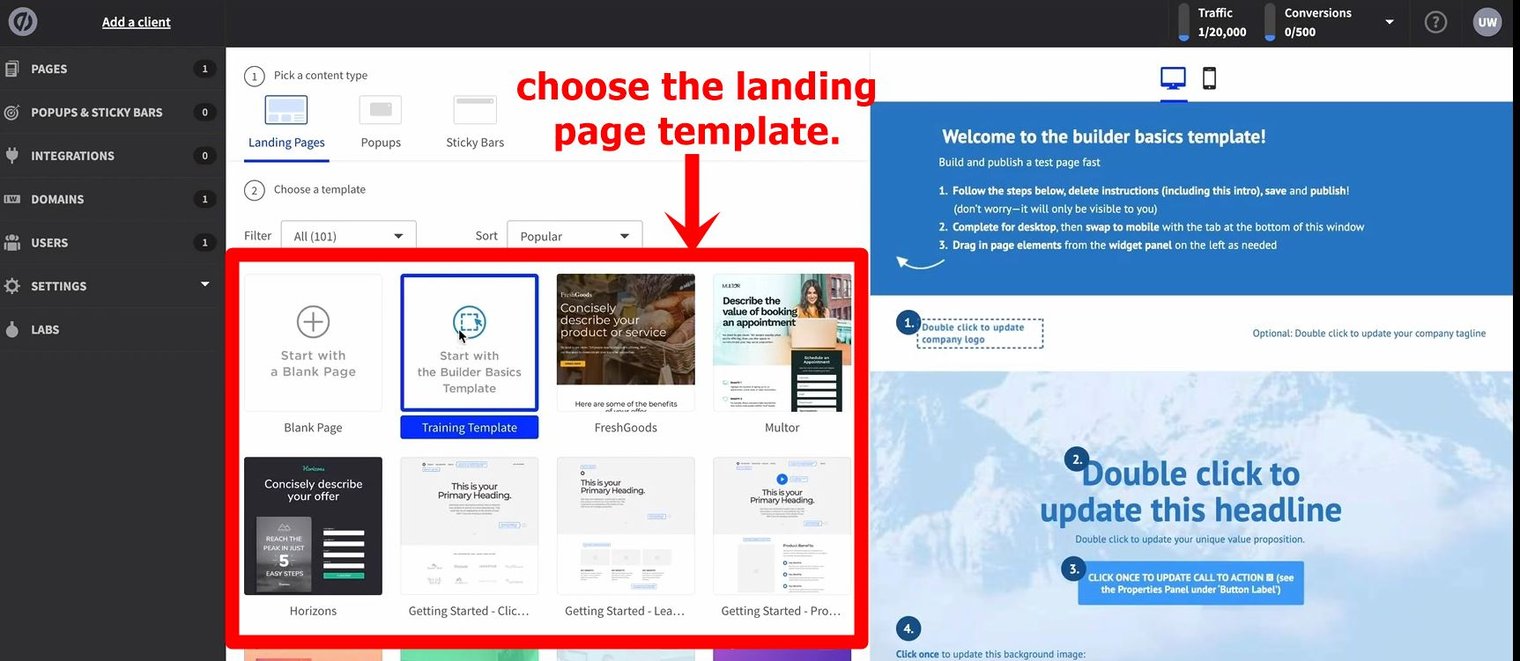
2. Choose a template for an Unbounce landing page
Unbounce has over 100 templates that you can use for a landing page, but you can also create one from scratch if you like. We chose the "Training template" for our landing page in this tutorial. Once you pick your template, Unbounce will direct you to the editor page.
One thing that you should consider when adding a blog to an Unbounce landing page is that your blog section will not fully appear when you add it to the mid-section of your landing page. If this is the option you want to take when implementing BlogHandy codes on your Unbounce landing page, you can design your blog section to be at the bottom to ensure your blog section will fully appear on your landing page.
We will dive deep into both options later on in this tutorial.
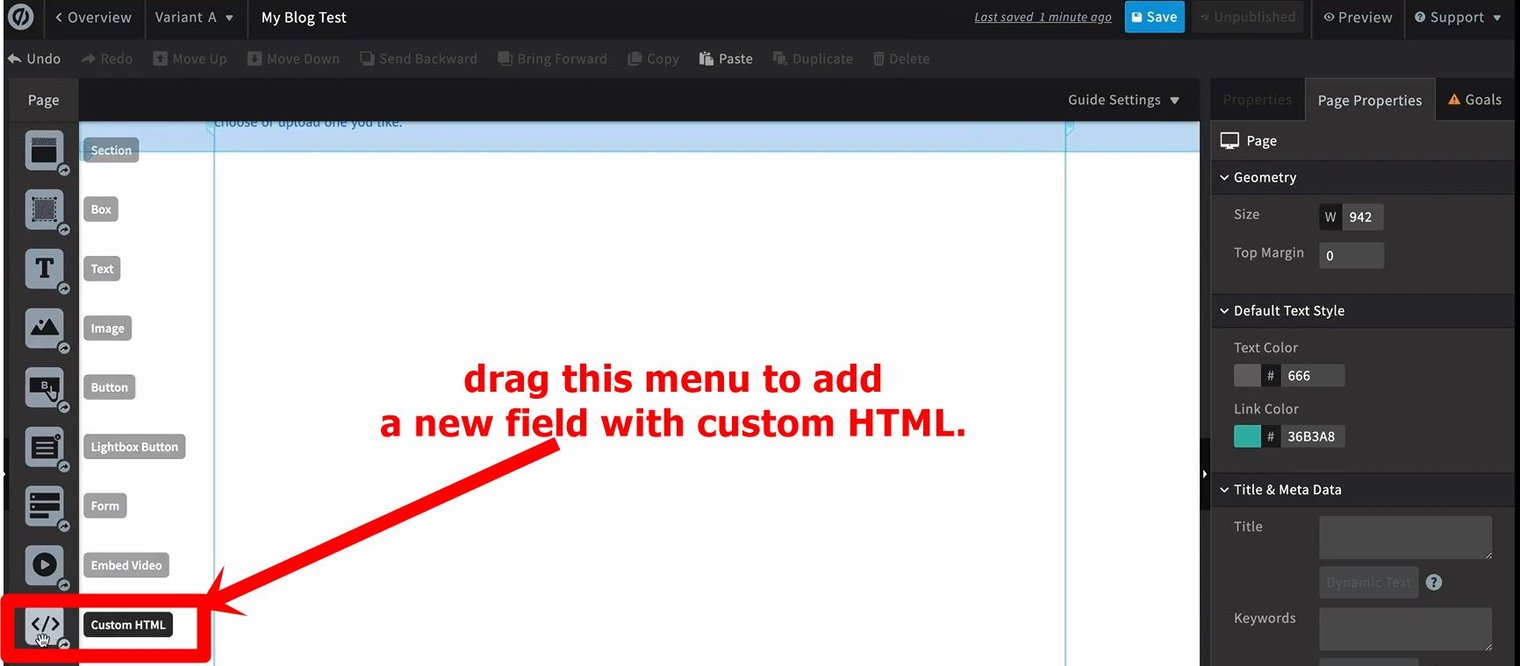
3. Add a custom HTML on a designated field for your blog
If you choose a ready-to-made template, you can remove the field where you want to add your blog on your Unbounce landing page. Once it's blank, hover to the left-hand side of your monitor where you can see the menu list of the features you can add on the editor page.
Click the "Custom HTML" option and drag it to the field section where you want your blog to appear. It will automatically show you an HTML box where you can add your BlogHandy codes to your Unbounce landing page.
Next, go to your BlogHandy dashboard and copy the first code snippet there to add to the HTML box on your Unbounce landing page editor. Repeat it for the second one, and place it under the first HTML on your Unbounce editor page. Click the "Save Code" button to incorporate it on the Unbounce landing page.

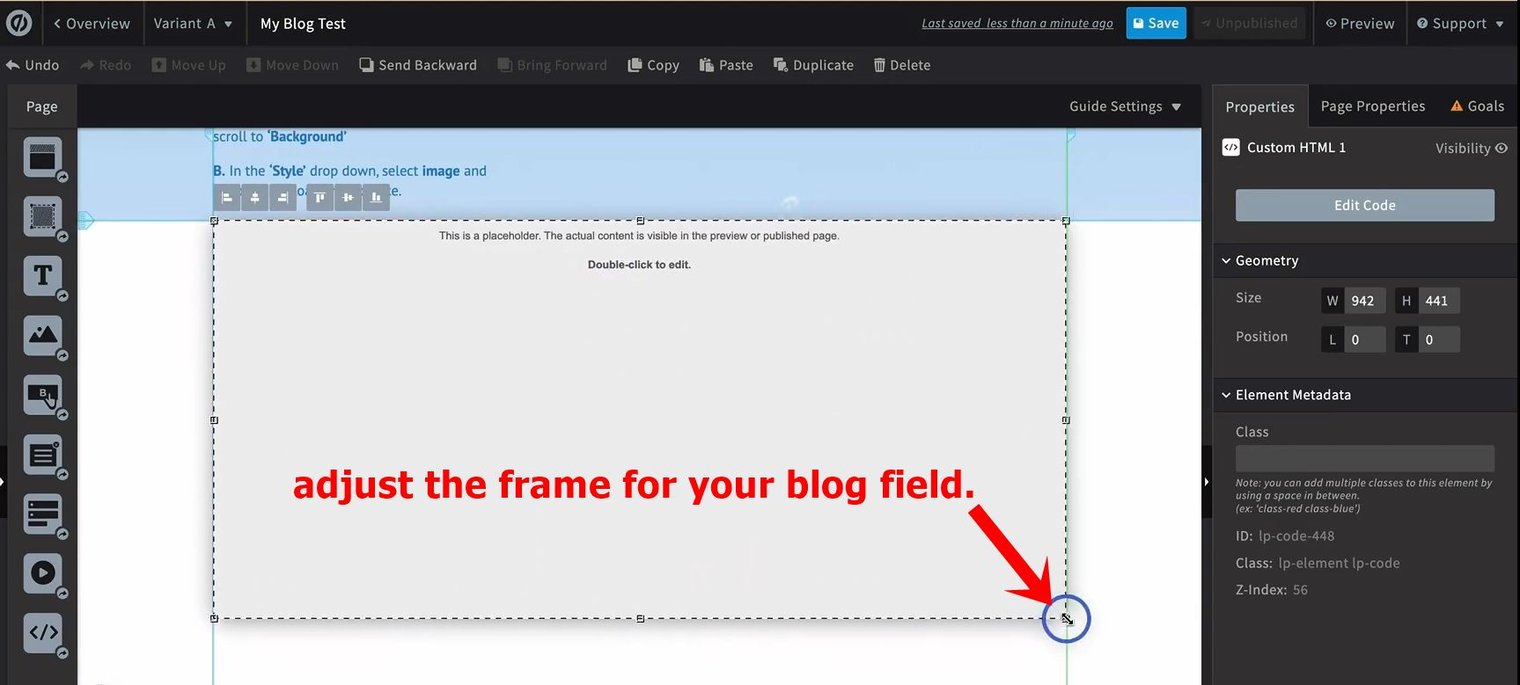
4. Adjust your blog field to fit your Unbounce landing page
Your blog will appear as a small box on your Unbounce page editor. Adjust your blog to fulfill your chosen field to ensure it's on the right measurement. You can drag the measurement to fulfill the field you choose for the blog.
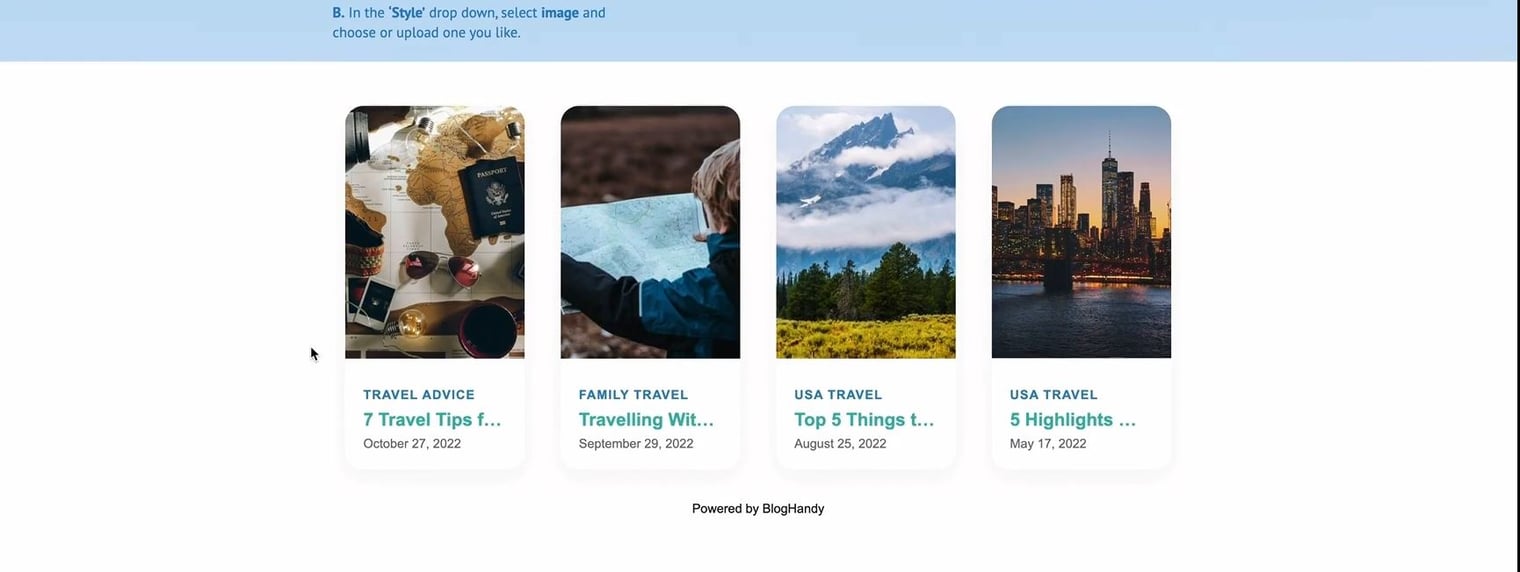
To check the measurement, click the "Save" button at the top and click "Preview" to see how the section looks from the audience's point of view.
5. Customize the functionality for your BlogHandy blog section on the Unbounce landing page
One of the issues with Unbounce integration with BlogHandy is that your blog may not be fully loaded if you place it in the mid-section of your Unbounce landing page. In this case, you can still add your blog on the field in the middle of your page by adding a simple scroll-down functionality, or you can just add the blog section at the bottom of your landing page.
This step will be split into two sections: how to ensure your audience can see the full post in the blog section on your Unbounce landing page, whether you add your blog in the middle or at the bottom of your page.
5.1 Add a scroll bar in your blog field on your Unbounce landing page
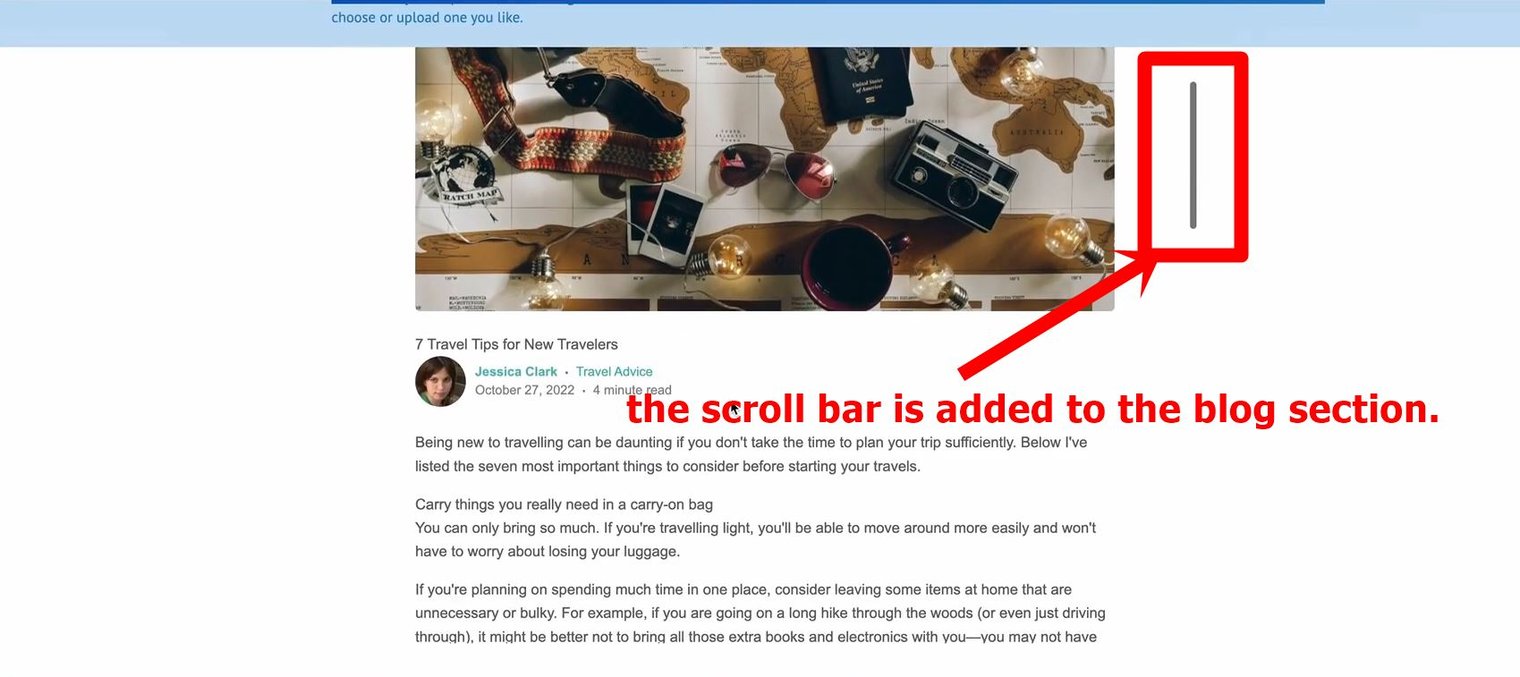
If you add your BlogHandy blog in the middle of the Unbounce landing page, you may need to add a simple CSS code to ensure you add the scroll-down functionality in your blog section. That way, your audience will be able to see the scroll bar to read your entire blog post on the landing page.
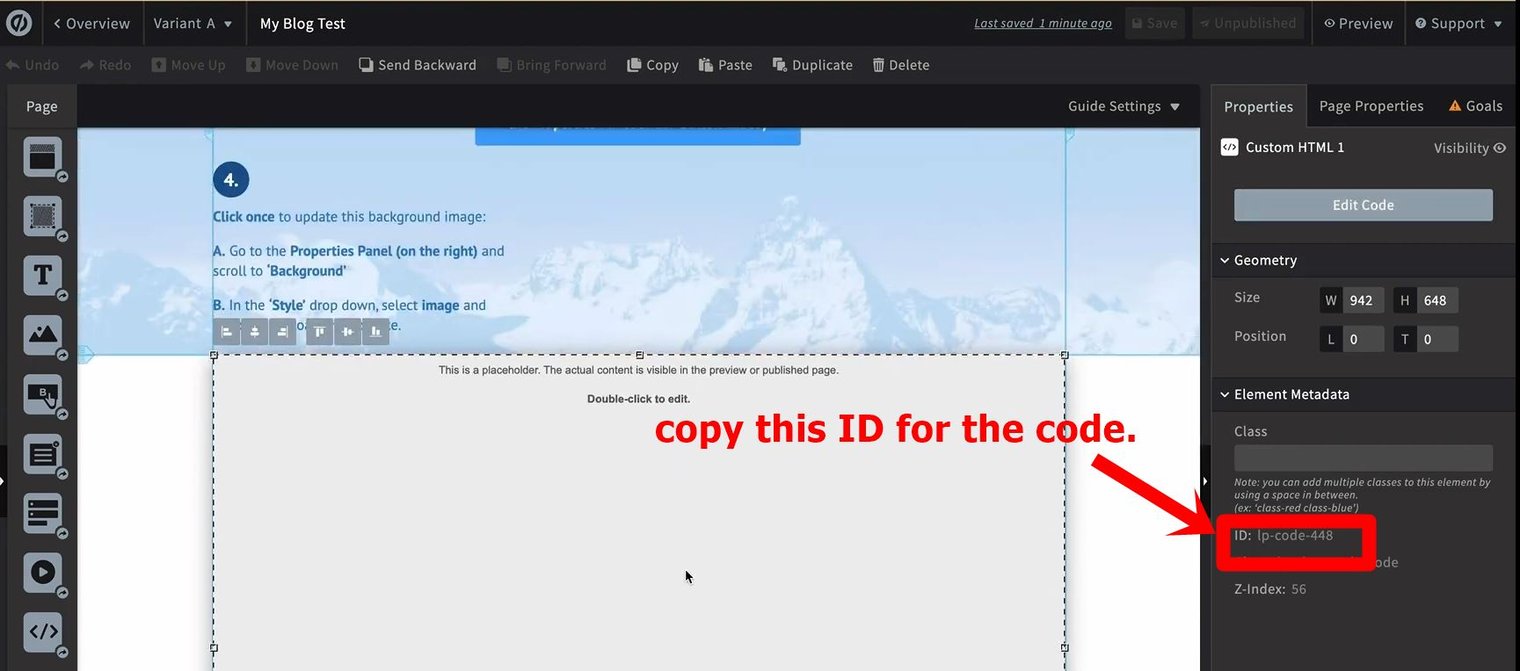
Click on the HTML box on your blog field, and check the right-hand side of your monitor under the "Properties" tab in the editor menu. You can see the "Element Metadata" section and the ID details under the "Class" column. You can select the ID code and copy it to add a scroll-down functionality in your blog section on Unbounce.
Hover to the bottom of the editor page, where you can see a few tabs: Content, Javascript, and Stylesheet. Click the "Stylesheet" tab, which will direct you to an empty box where you can add the code for the scroll-down functionality for your blog on Unbounce.
Add the CSS for the scroll function on your blog below:
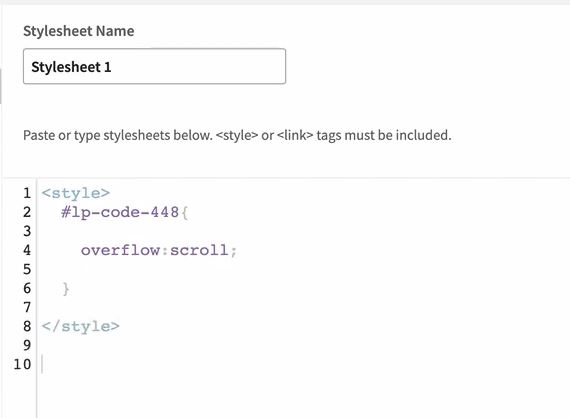
Click "Done" to finalize, and you can click on the "Save" button on the main editor page.
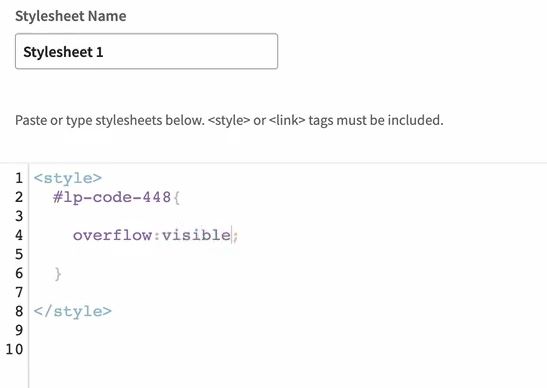
5.2 Add the visibility function to showcase the full blog post on the Unbounce landing page
Meanwhile, you can also place your blog section at the bottom of your Unbounce landing page. The step is similar to the previous one, except for the CSS code you need to add to your Unbounce landing page.
If you add your BlogHandy blog at the bottom field of your landing page, you can add the following code instead:
#6 Publish your Unbounce landing page
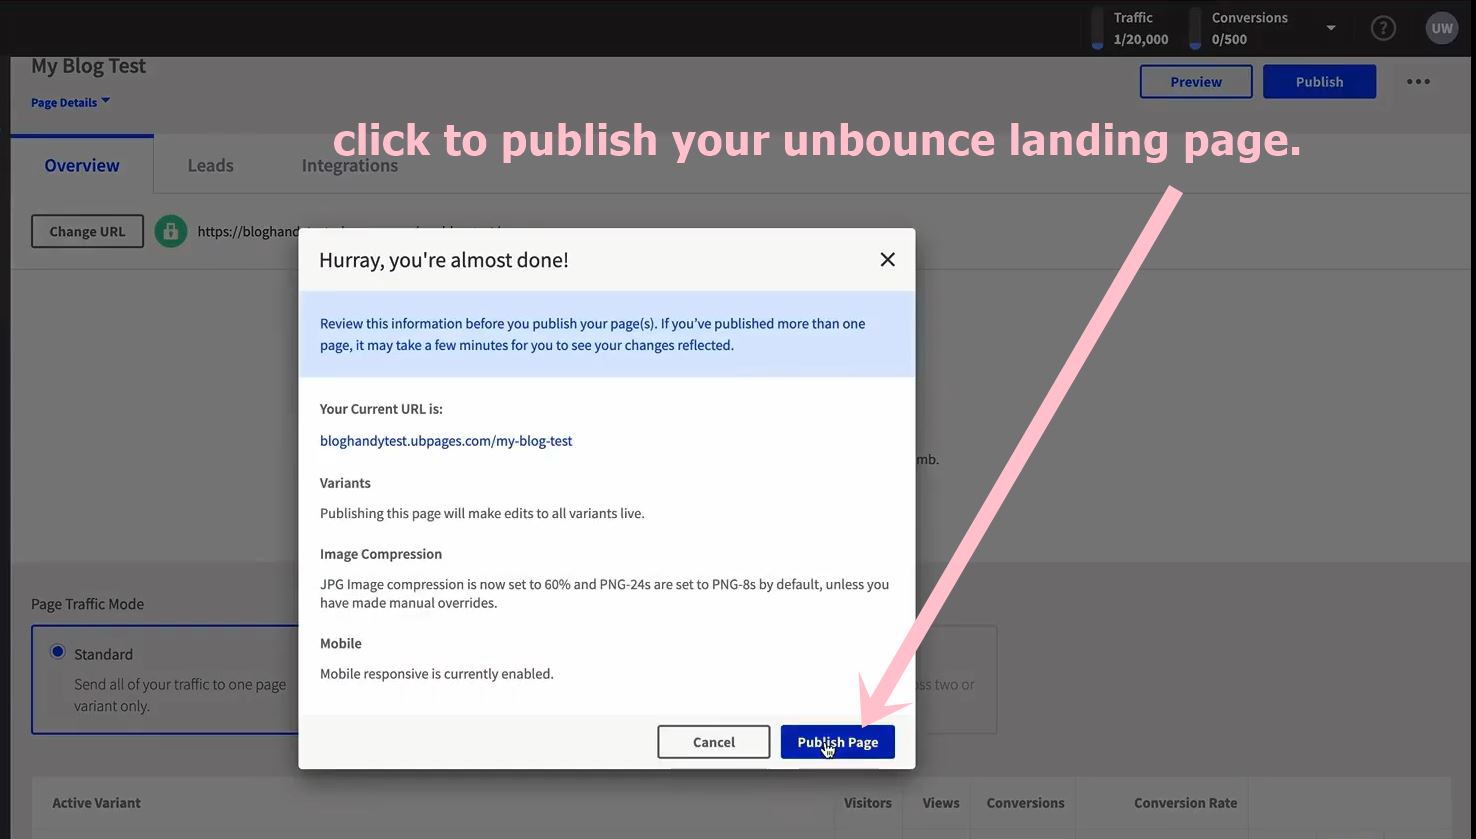
To finalize publishing your Unbounce landing page, go to the top menu where you can see "Overview." It will direct you to the Overview page where you will see all the details about your unpublished landing page, including the URL and other functionalities on your Unbounce page.
On the top right, you will find the "Publish" button. Click on it to publish your Unbounce landing page.
Once published, you can click the URL to test the functionalities on your Unbounce landing page. You can scroll directly to the blog field on your Unbounce landing page, and depending on where you add the blog section, you can check if all the functionalities work accordingly.
If you add your blog in the middle of your Unbounce landing page, a scroll bar should appear when you click a single blog post. But if you have it at the bottom of your page, you should be able to read a single blog post in the designated field.
#7 Add the Unbounce landing page URL to BlogHandy Settings
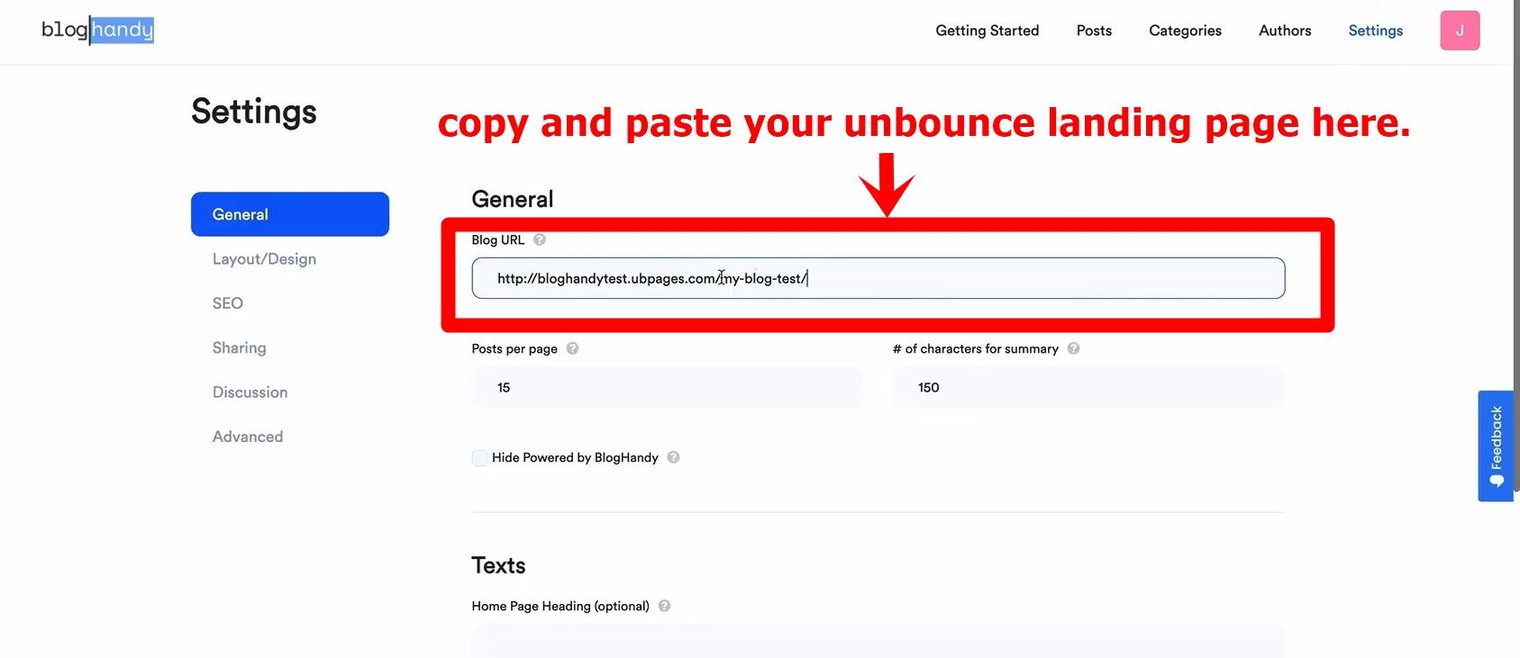
Next, you need to fully integrate your Unbounce landing page with BlogHandy, so whenever you make changes on your BlogHandy dashboard, it will automatically appear on your landing page.
Copy the Unbounce landing page URL, and go to the BlogHandy Settings where you can paste it under the "Blog URL" column. Click on the "Save all changes" button to finalize.
Conclusion
Compared to other landing page builders, Unbounce prides itself on its advanced AI functionalities for design and copywriting. You can maximize their functionalities when you add a blog to an Unbounce landing page with BlogHandy, as you can combine AI copywriting with the built-in SEO and social sharing tools that BlogHandy offers in their platform.
When you combine both Unbounce and BlogHandy features, you can focus on creating high-quality content to drive traffic to your landing page while simultaneously having a landing page set up for your audience to take action about the pain points where your business can come up as a solution.
So, are you ready to maximize your Unbounce landing page with a blog? Sign up for a BlogHandy account now to enrich your landing page functionalities with the blogging features!