
Mailerlite is among the most popular landing page builders on the market. Like ActiveCampaign and ConvertKit, it's also one of the best email marketing platforms and is particularly popular with content creators and digital businesses.
Building your online presence through a business website isn't complete without optimizing it with content, and this is where BlogHandy came up.
If you're a Mailerlite user looking to add blog functionality to your Mailerlite website or landing page, you can now add a blog to your Mailerlite page with BlogHandy by adding two lines of code.
Not only will it help you optimize your online visibility through the World Wide Web, but it can also showcase your expertise to prove your credibility no matter which industry you're in.
In this post, we're going to share a short tutorial on how to optimize your Mailerlite website or landing page using BlogHandy as an add-on.
What is Mailerlite?
One of Mailerlite's advantages over other landing page builders in the market is its user-friendly interface and affordability.
You can upgrade to Mailerlite's premium plan at a fraction of the cost compared to other tools like Unbounce or ClickFunnels. Whether you want to utilize it to grow your email list or create more leads to the landing page, Mailerlite can automate your marketing plan as you go.
Free Mailerlite users can create up to 10 landing pages on the platform and send over 10,000 emails per month. If you're ready to scale your email marketing plan, you can also sign up for its higher tiers - which will allow you to create and send an unlimited number of emails to your audience.
Not sure whether it's worth upgrading to Mailerlite premium plans?
One of the main advantages of subscribing to either Mailerlite Growing Business or Advanced Plan is the ability to add a custom domain for any website or landing page you create on Mailerlite. The latter functionality isn't available on the Free Plan, as your Mailerlite website and landing page will use the default domain with subscribepage.io.
Regardless of which plan you're using for your Mailerlite account, you can now add a blog to your Mailerlite website or landing page with BlogHandy.
BlogHandy is a SaaS tool that enables you to add a blog and integrate it seamlessly into your existing website, no matter which platform you use as a web builder.
Just by adding a few lines of BlogHandy code to your Mailerlite website or landing page, you can now start optimizing your business website with search-engine-optimized blog posts. BlogHandy also comes with built-in social sharing and SEO tools that will help you boost your web presence on Google and other search engines.
Tutorial: Adding a Blog to Mailelite Website or Landing Page with BlogHandy
In this section, we'll explore step-by-step how to add a blog page to a Mailerlite website or landing page using Bloghandy.
From creating a Mailerlite website from scratch to adding codes and integrating your Mailerlite with BlogHandy - here's everything you need to know about adding blogging functionalities to your Mailerlite!
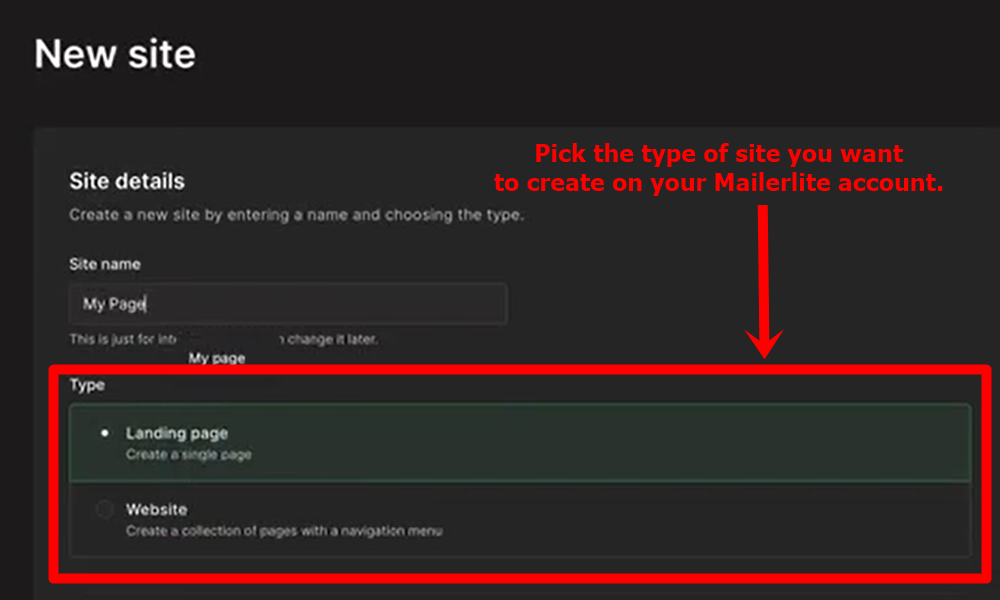
#1 Create a site on your Mailerlite account
First, go to your Mailerlite dashboard. On the left-hand side of your monitor, you'll see a list of feature menus where you can click the "Sites" option. It will lead you to the next step in creating a Mailerlite landing page.
On the next page, you'll see the "Create" button; click on the button to start a Mailerlite site on your account.
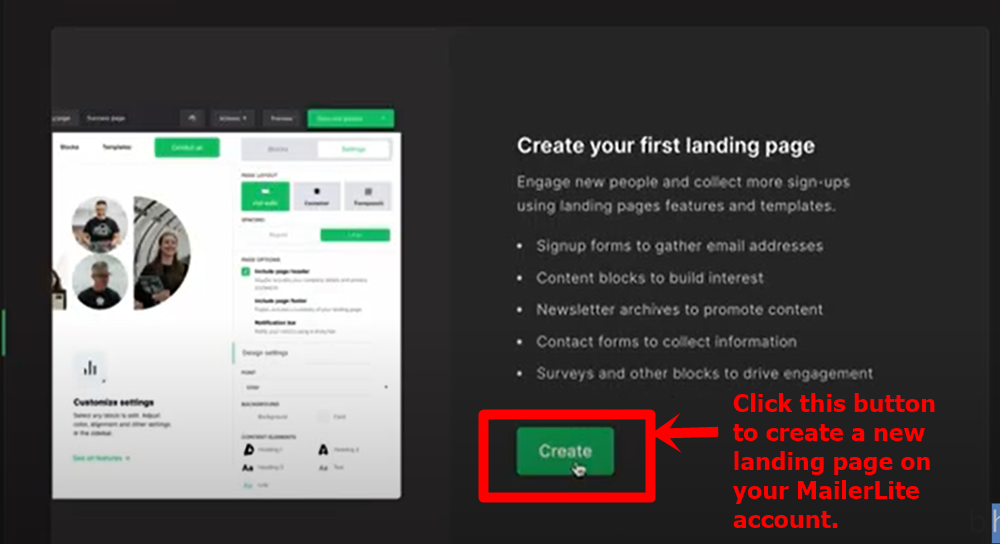
It will take you to the form where you can fill out the site details - including the site name and the type of page you want to create. Once it's done, click the "Save and continue" button to get to the next step.
#2 Choose the subscriber group for your Mailerlite website or landing page
Next, you will have to select a subscriber group to integrate your website into the Mailerlite email marketing functionalities.
The idea of choosing a subscriber group is to organize your audience group and segmentation for each page you create on Mailerlite, especially if you want to add a sign-up form on your website or landing page.
It will streamline your email marketing strategy moving forward, so make sure to add the correct subscriber group according to the page you want to create. Alternatively, you can also click the "Add new group" button to generate a new segment for each Mailerlite page.
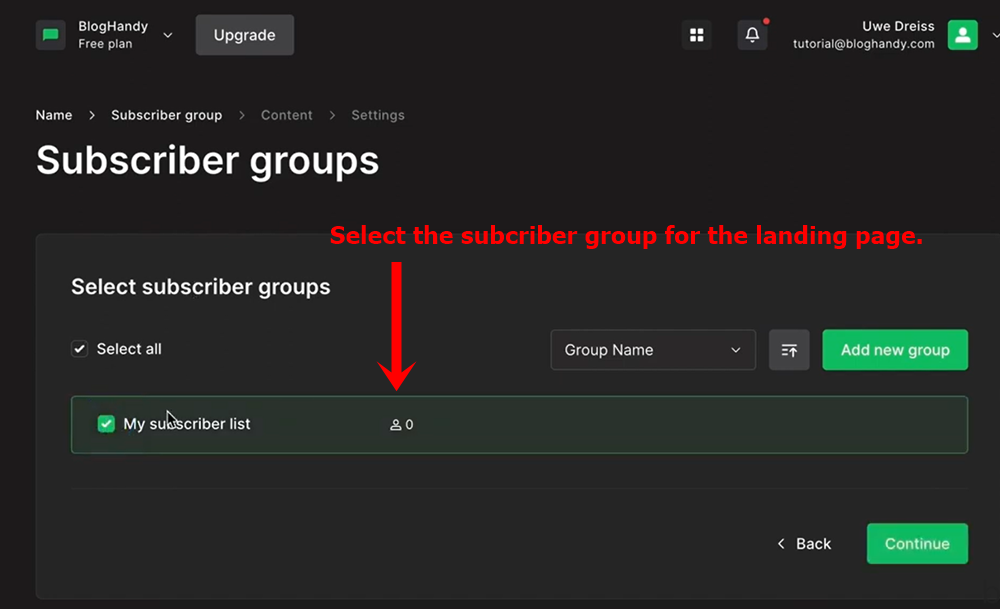
Once it's done, you can click "Continue."
#3 Choose a Mailerlite template
Mailerlite will then take you to a collection of templates that you can choose to build your landing page. In order to utilize their ready-to-use templates, you will need to be a paid user of Mailerlite.
If you use a free Mailerlite, by default you will need to build a website or landing page from scratch. Hover to the "Start from scratch" box, and then you will see a "Create" button.
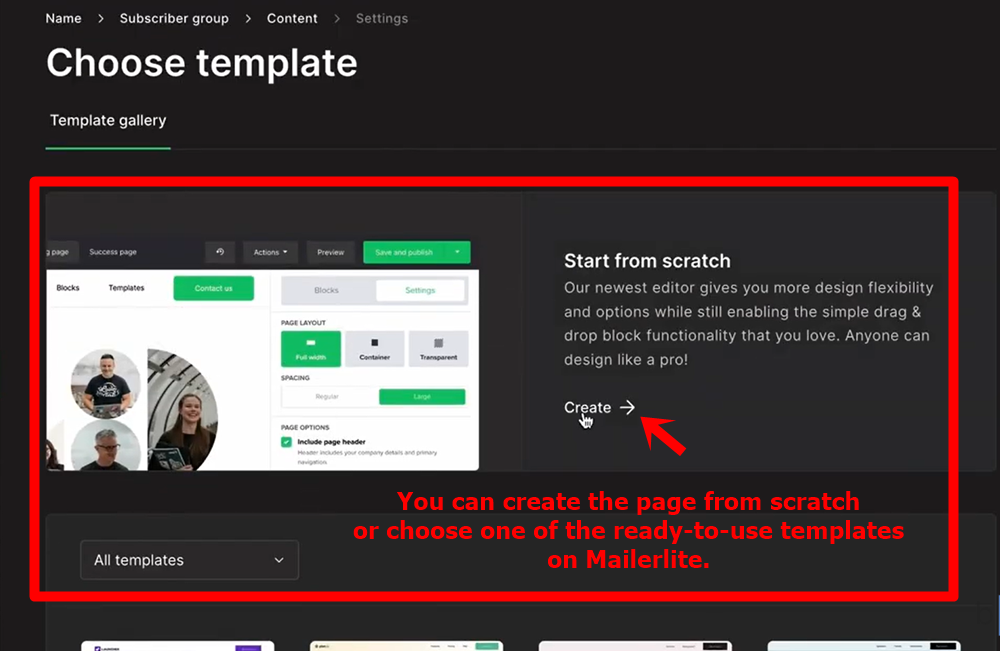
Click on it, and it will take you to the web editor page on your Mailerlite account.
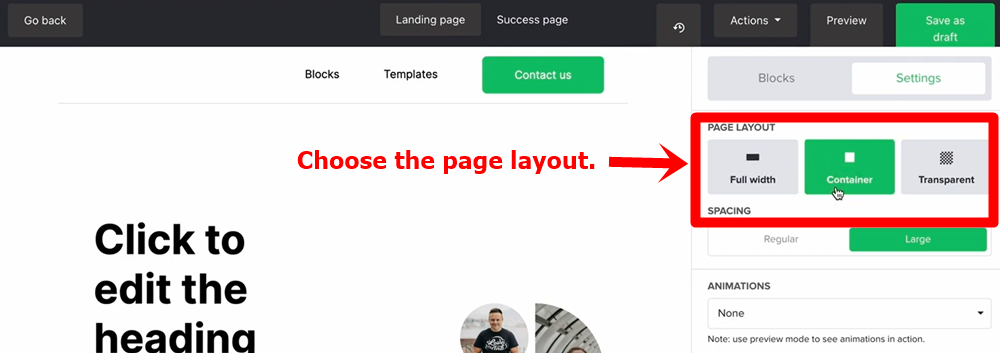
#4 Set the page layout on Mailerlite
You can choose the page layout on Settings, which is visible on the right side of your monitor. The page has three options: full-width, container, and transparent.
Mailerlite uses drag-and-drop features for landing pages and website editing, so it's pretty handy even for beginners.
Next, select the layout you want to use for your Mailerlite page and then click the Block option.
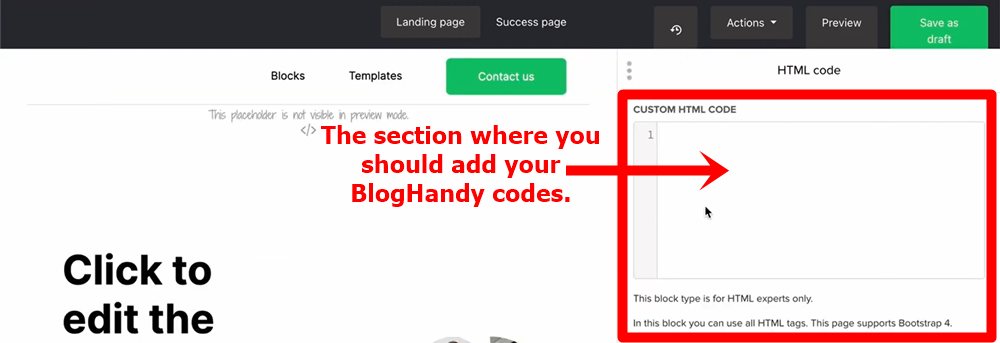
Under the Block section, you will see some element options that you can add to your landing page. Scroll down until you find "HTML Code," then you can drag the block and drop it in the section where you want your blog to show up.

In the section where you drop the HTML Code block, you'll see "The placeholder is not visible in preview mode" written on the block. Click on it, and a box will appear next to it where you can add the custom HTML Code for your Mailerlite website and landing page.
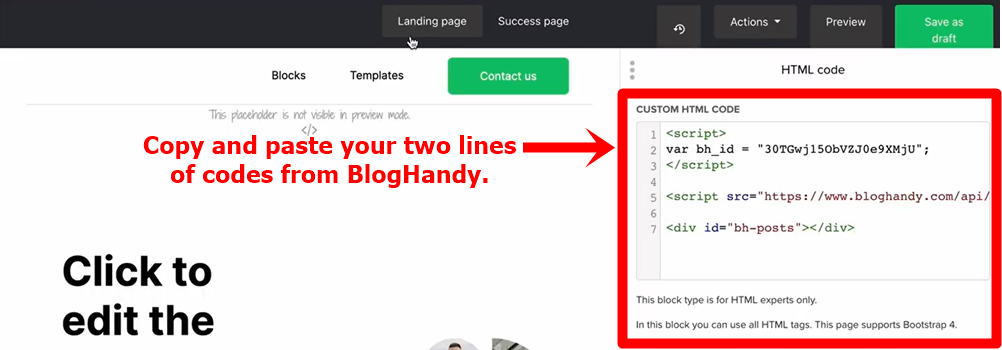
#5 Copy and paste your BlogHandy codes
Now, sign in to your BlogHandy account. On the dashboard, you will see two lines of BlogHandy code that you need to integrate into your Mailerlite account.
Copy both codes and paste them into the box you see earlier on your Mailerlite editor page. Click the "Save" button to finalize.
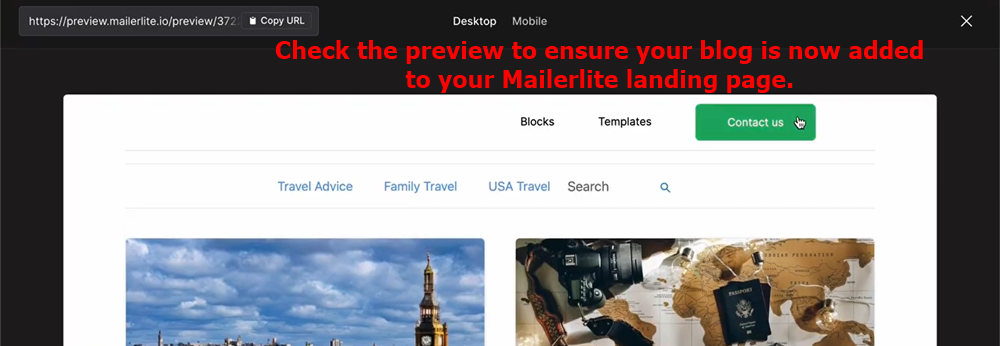
#6 Preview your Mailerlite website or landing page interface
Since the code won't appear automatically on the preview page, go to the top of your editor page on Mailerlite and select "Preview" to see the interface of the landing page you created.
If you place the BlogHandy codes correctly, your BlogHandy blog should appear on the preview. If not, you may want to go back to the BlogHandy codes and ensure that both codes are placed nicely on the HTML box.
Once everything is good to go, return to the editor page and click the "Save as draft" button in the upper right corner of your monitor.
#7 Set up your Mailerlite website or landing page
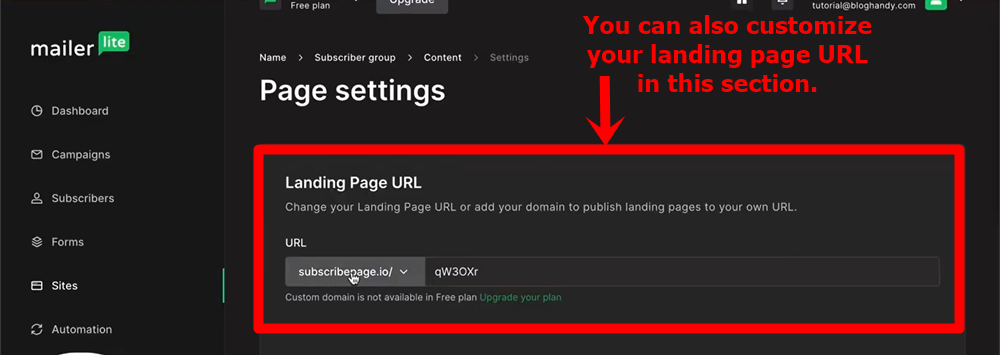
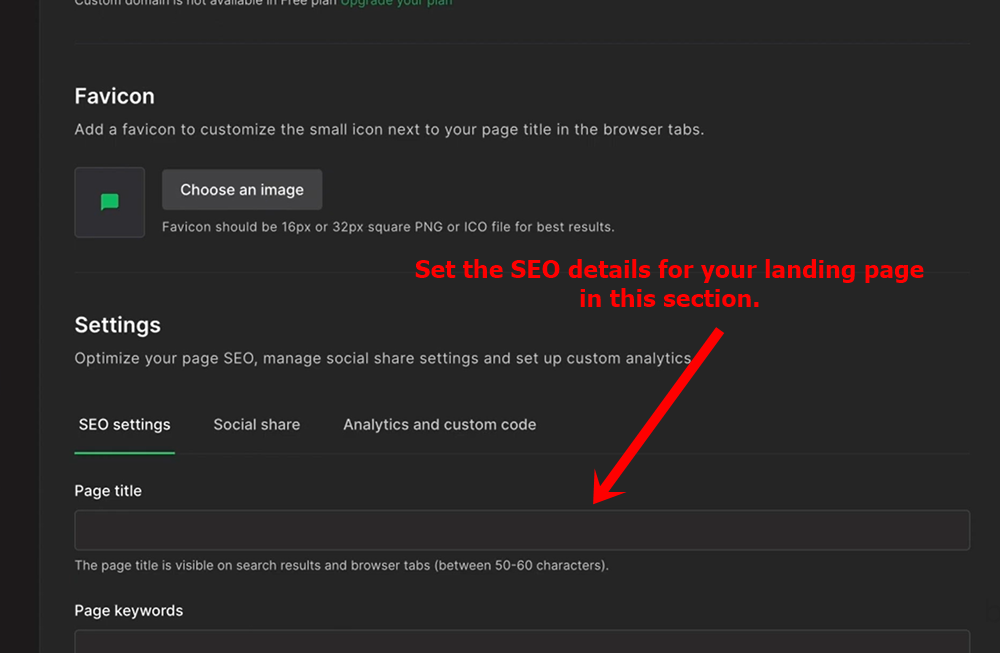
You will be directed to the Page Settings section on Mailerlite, where you can customize the permalink and optimize your landing page for SEO.
By default, Mailerlite will use subscribepage.io as the landing page domain. If you have a paid Mailerlite account, you can set up a custom domain separately.
However, you can still customize the permalink after subscribepage.io to organize your Mailerlite websites and landing pages. So, instead of using the random letters and numbers that Mailerlite created by default, you can change them accordingly.
Under the permalink option, you can add an image and set it as your landing page's favicon. Next, you can also optimize your landing page for SEO by adding all the necessary elements for search engines: page title, page description, as well as targeted keywords.
Click "Save and continue" to get to the next step.
#8 Publish your Mailerlite landing page or website
The next section will be all the details related to your Mailerlite landing page, including the page status, general settings, and the subscriber group that you set up earlier.
If the status isn't published yet, you can click the "Publish" button to finalize.
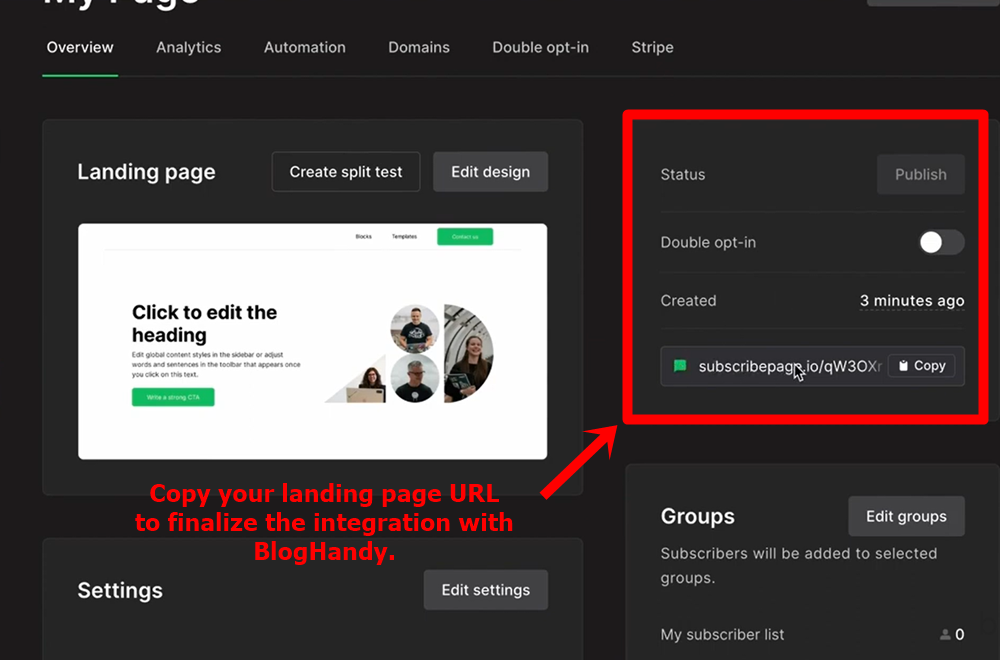
Under the landing page status, you will find the landing page URL. Copy the URL to finalize the integration of your Mailerlite landing page with BlogHandy.
#9 Fully integrate your Mailerlite Website with BlogHandy
Go back to your BlogHandy account, and click "Settings" to finalize the integration.
Under the "General Settings" section, paste your Mailerlite landing page URL in the Blog URL column. Make sure to add the https:// before the URL to ensure the proper integration of your Mailerlite and BlogHandy account.
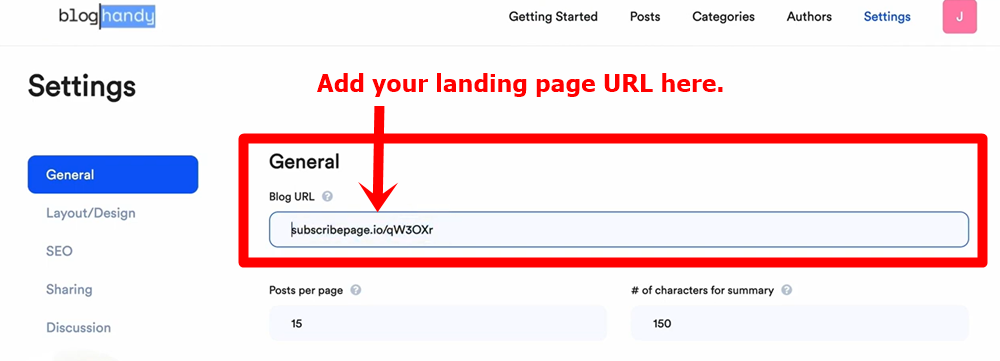
Scroll down and click "Save all changes."
#10 Change your BlogHandy blog design
Stay under the BlogHandy Settings, and click the Layout/Design section to change the blog layout.
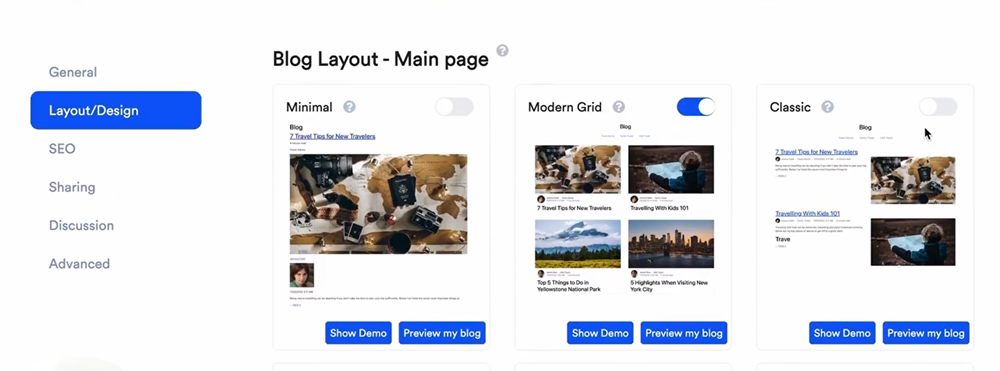
BlogHandy has nine default templates that you can choose for your blog layout, and you can choose one according to your preference. Alternatively, you can customize the layout by adding custom CSS to the settings.
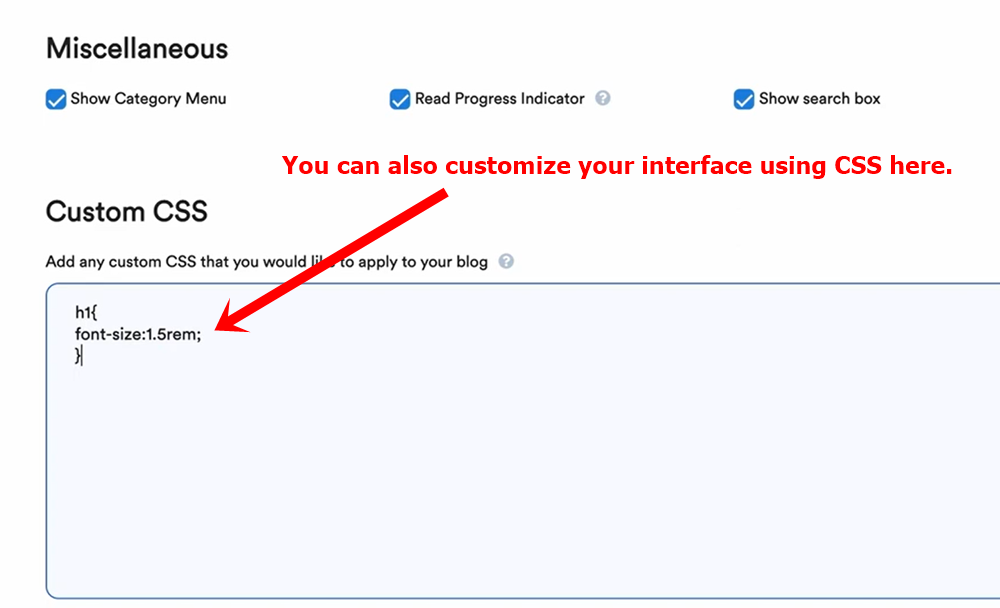
Scroll down, and you will see the Custom CSS box where you can place the custom codes on your BlogHandy settings. Don't forget to click "Save all changes" to finalize.
Conclusion
Mailerlite is one of the most user-friendly email marketing tools - but on top of that, it's also a great tool for creating a website or landing page.
With its drag-and-drop features, it's beginner-friendly and you can customize your Mailerlite website or landing page according to how you want it to serve your audience or customers.
Adding a blog can be a great way to optimize your website for search engines so you can drive organic traffic through a content marketing strategy for your business.
If you use Mailerlite to create your website or landing page, you can now sign up for a BlogHandy account to incorporate a blogging functionality to your page. You can also upgrade to our Premium plans to fully customize your blog page on your Mailerlite website.
So, what are you waiting for?